15 KiB
| stage | group | info |
|---|---|---|
| Configure | Configure | To determine the technical writer assigned to the Stage/Group associated with this page, see https://about.gitlab.com/handbook/engineering/ux/technical-writing/#assignments |
Install the GitLab Kubernetes Agent (FREE)
Moved to GitLab Free in 14.5.
To get started with the GitLab Kubernetes Agent, install it in your cluster.
Pre-requisites:
- An existing Kubernetes cluster.
- An account on GitLab.
Installation steps
To install the GitLab Kubernetes Agent in your cluster:
- Set up the Kubernetes Agent Server for your GitLab instance.
- Define a configuration repository.
- Create an Agent record in GitLab.
- Install the Agent into the cluster.
- Generate and copy a Secret token used to connect to the Agent.
- Create manifest files.
Watch a GitLab 14.2 walking-through video with this process.
Set up the Kubernetes Agent Server
Introduced in GitLab Premium 13.10, the GitLab Kubernetes Agent Server (KAS) became available on GitLab.com under
wss://kas.gitlab.com.
To use the KAS:
- If you are a self-managed user, follow the instructions to install the Kubernetes Agent Server.
- If you are a GitLab.com user, when you set up the configuration repository for your agent, use
wss://kas.gitlab.comas the--kas-address.
Define a configuration repository
- Introduced in GitLab 13.7, the Agent manifest configuration can be added to multiple directories (or subdirectories) of its repository.
- Group authorization was introduced in GitLab 14.3.
To configure an Agent, you need:
- A GitLab repository to hold the configuration file.
- Install the Agent in a cluster.
After installed, when you update the configuration file, GitLab transmits the information to the cluster automatically without downtime.
In your repository, add the Agent configuration file under:
.gitlab/agents/<agent-name>/config.yaml
Make sure that <agent-name> conforms to the Agent's naming format.
Your config.yaml file specifies all configurations of the Agent, such as:
- The manifest projects to synchronize.
- The groups that can access this Agent via the CI/CD Tunnel.
- The address of the
hubble-relayfor the Network Security policy integrations.
As an example, a minimal Agent configuration that sets up only the manifest synchronizations is:
gitops:
  manifest_projects:
  # The `id` is the path to the Git repository holding your manifest files
  - id: "path/to/your-manifest-project-1"
    paths:
    - glob: '/**/*.{yaml,yml,json}'
All the options for the Kubernetes Agent configuration repository are documented separately.
Create an Agent record in GitLab
Introduced in GitLab 14.1, you can create a new Agent record directly from the GitLab UI.
Next, create a GitLab Rails Agent record to associate it with the configuration repository project. Creating this record also creates a Secret needed to configure the Agent in subsequent steps.
In GitLab:
- Ensure that GitLab CI/CD is enabled in your project.
- From your project's sidebar, select Infrastructure > Kubernetes clusters.
- Select Actions.
- From the Select an Agent dropdown, select the Agent you want to connect and select Register Agent to access the installation form.
- The form reveals your registration token. Securely store this secret token as you cannot view it again.
- Copy the command under Recommended installation method.
In your computer:
- Open your local terminal and connect to your cluster.
- Run the command you copied from the installation form.
Install the Agent into the cluster
To install the in-cluster component of the Agent, first you need to define a namespace. To create a new namespace,
for example, gitlab-kubernetes-agent, run:
kubectl create namespace gitlab-kubernetes-agent
To perform a one-liner installation, run the command below. Make sure to replace:
your-agent-tokenwith the token received from the previous step (identified assecretin the JSON output).gitlab-kubernetes-agentwith the namespace you defined in the previous step.wss://kas.gitlab.example.comwith the configured access of the Kubernetes Agent Server (KAS). For GitLab.com users, the KAS is available underwss://kas.gitlab.com.--agent-version=vX.Y.Zwith the latest released patch version matching your GitLab installation's major and minor versions. For example, for GitLab v13.9.0, use--agent-version=v13.9.1. You can find your GitLab version under the "Help/Help" menu.
docker run --pull=always --rm registry.gitlab.com/gitlab-org/cluster-integration/gitlab-agent/cli:stable generate --agent-token=your-agent-token --kas-address=wss://kas.gitlab.example.com --agent-version=vX.Y.Z --namespace gitlab-kubernetes-agent | kubectl apply -f -
WARNING:
--agent-version stable can be used to refer to the latest stable release at the time when the command runs. It's fine for
testing purposes but for production please make sure to specify a matching version explicitly.
To find out the various options the above Docker container supports, run:
docker run --pull=always --rm registry.gitlab.com/gitlab-org/cluster-integration/gitlab-agent/cli:stable generate --help
Advanced installation
For more advanced configurations, we recommend to use the kpt based installation method.
Otherwise, follow the manual installation steps described below.
Create the Kubernetes secret
After generating the token, you must apply it to the Kubernetes cluster.
To create your Secret, run:
kubectl create secret generic -n gitlab-kubernetes-agent gitlab-kubernetes-agent-token --from-literal=token='YOUR_AGENT_TOKEN'
The following example file contains the
Kubernetes resources required for the Agent to be installed. You can modify this
example resources.yml file in the following ways:
- Replace
namespace: gitlab-kubernetes-agentwithnamespace: <YOUR-DESIRED-NAMESPACE>. - You can configure
kas-address(Kubernetes Agent Server) in several ways. The agent can use the WebSockets or gRPC protocols to connect to the Agent Server. Select the option appropriate for your cluster configuration and GitLab architecture:- The
wssscheme (an encrypted WebSockets connection) is specified by default after you install thegitlab-kassub-chart, or enablegitlab-kasfor Omnibus GitLab. When using the sub-chart, you must setwss://kas.host.tld:443askas-address, wherehost.tldis the domain you've setup for your GitLab installation. When using Omnibus GitLab, you must setwss://GitLab.host.tld:443/-/kubernetes-agent/askas-address, whereGitLab.host.tldis your GitLab hostname. - When using the sub-chart, specify the
wsscheme (such asws://kas.host.tld:80) to use an unencrypted WebSockets connection. When using the Omnibus GitLab, specify thewsscheme (such asws://GitLab.host.tld:80/-/kubernetes-agent/). - Specify the
grpcscheme if both Agent and Server are installed in one cluster. In this case, you may specifykas-addressvalue asgrpc://gitlab-kas.<your-namespace>:8150) to use gRPC directly, wheregitlab-kasis the name of the service created bygitlab-kaschart, and<your-namespace>is the namespace where the chart was installed. - Specify the
grpcsscheme to use an encrypted gRPC connection. - When deploying KAS through the GitLab chart, it's possible to customize the
kas-addressforwssandwsschemes to whatever you need. Check the chart's KAS Ingress documentation to learn more about it. - In the near future, Omnibus GitLab intends to provision
gitlab-kasunder a sub-domain by default, instead of the/-/kubernetes-agent/path. Please follow this issue for details.
- The
- If you defined your own secret name, replace
gitlab-kubernetes-agent-tokenwith your secret name in thesecretName:section.
To apply this file, run the following command:
kubectl apply -n gitlab-kubernetes-agent -f ./resources.yml
To review your configuration, run the following command:
$ kubectl get pods -n gitlab-kubernetes-agent

NAMESPACE                NAME                                          READY   STATUS    RESTARTS   AGE
gitlab-kubernetes-agent  gitlab-kubernetes-agent-77689f7dcb-5skqk      1/1     Running   0          51s
Example resources.yml file
---
apiVersion: v1
kind: Namespace
metadata:
  name: gitlab-kubernetes-agent
---
apiVersion: v1
kind: ServiceAccount
metadata:
  name: gitlab-kubernetes-agent
---
apiVersion: apps/v1
kind: Deployment
metadata:
  name: gitlab-kubernetes-agent
spec:
  replicas: 1
  selector:
    matchLabels:
      app: gitlab-kubernetes-agent
  template:
    metadata:
      labels:
        app: gitlab-kubernetes-agent
    spec:
      serviceAccountName: gitlab-kubernetes-agent
      containers:
      - name: agent
        # Make sure to specify a matching version for production
        image: "registry.gitlab.com/gitlab-org/cluster-integration/gitlab-agent/agentk:vX.Y.Z"
        args:
        - --token-file=/config/token
        - --kas-address
        - wss://kas.host.tld:443 # replace this line with the line below if using Omnibus GitLab or GitLab.com.
        # - wss://gitlab.host.tld:443/-/kubernetes-agent/
        # - wss://kas.gitlab.com # for GitLab.com users, use this KAS.
        # - grpc://host.docker.internal:8150 # use this attribute when connecting from Docker.
        volumeMounts:
        - name: token-volume
          mountPath: /config
      volumes:
      - name: token-volume
        secret:
          secretName: gitlab-kubernetes-agent-token
  strategy:
    type: RollingUpdate
    rollingUpdate:
      maxSurge: 0
      maxUnavailable: 1
---
apiVersion: rbac.authorization.k8s.io/v1
kind: ClusterRole
metadata:
  name: gitlab-kubernetes-agent-write
rules:
- resources:
  - '*'
  apiGroups:
  - '*'
  verbs:
  - create
  - update
  - delete
  - patch
---
apiVersion: rbac.authorization.k8s.io/v1
kind: ClusterRoleBinding
metadata:
  name: gitlab-kubernetes-agent-write-binding
roleRef:
  name: gitlab-kubernetes-agent-write
  kind: ClusterRole
  apiGroup: rbac.authorization.k8s.io
subjects:
- name: gitlab-kubernetes-agent
  kind: ServiceAccount
  namespace: gitlab-kubernetes-agent
---
apiVersion: rbac.authorization.k8s.io/v1
kind: ClusterRole
metadata:
  name: gitlab-kubernetes-agent-read
rules:
- resources:
  - '*'
  apiGroups:
  - '*'
  verbs:
  - get
  - list
  - watch
---
apiVersion: rbac.authorization.k8s.io/v1
kind: ClusterRoleBinding
metadata:
  name: gitlab-kubernetes-agent-read-binding
roleRef:
  name: gitlab-kubernetes-agent-read
  kind: ClusterRole
  apiGroup: rbac.authorization.k8s.io
subjects:
- name: gitlab-kubernetes-agent
  kind: ServiceAccount
  namespace: gitlab-kubernetes-agent
Create manifest files
In a previous step, you configured a config.yaml to point to the GitLab projects
the Agent should synchronize. Agent monitors each of those projects for changes to the manifest files it contains. You can auto-generate manifest files with a
templating engine or other means.
The agent is authorized to download manifests for the configuration project, and public projects. Support for other private projects is planned in the issue Agent authorization for private manifest projects.
Each time you push a change to a monitored manifest repository, the Agent logs the change:
2020-09-15_14:09:04.87946 gitlab-k8s-agent : time="2020-09-15T10:09:04-04:00" level=info msg="Config: new commit" agent_id=1 commit_id=e6a3651f1faa2e928fe6120e254c122451be4eea
Example manifest file
This file creates a minimal ConfigMap:
apiVersion: v1
kind: ConfigMap
metadata:
  name: demo-map
  namespace: gitlab-kubernetes-agent  # Can be any namespace managed by you that the agent has access to.
data:
  key: value
Example projects
The following example projects can help you get started with the Kubernetes Agent.
- Configuration repository
- This basic GitOps example deploys NGINX: Manifest repository
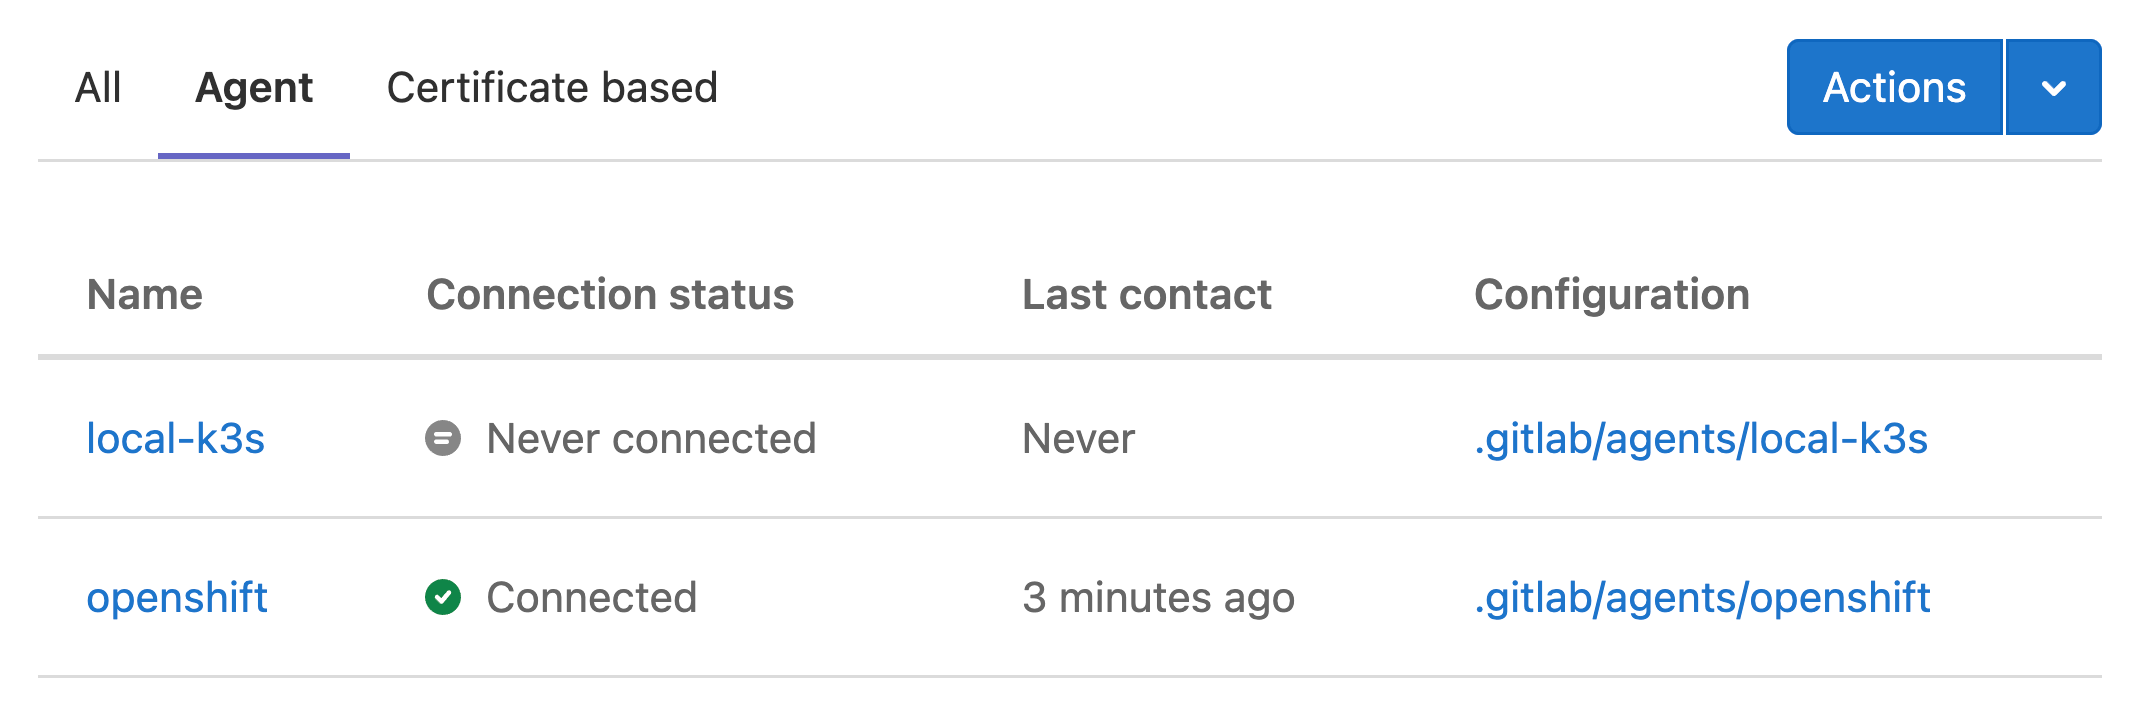
View installed Agents
Users with at least the Developer can access the user interface for the GitLab Kubernetes Agent at Infrastructure > Kubernetes clusters, under the Agent tab. This page lists all registered agents for the current project, and the configuration directory for each agent:
Additional management interfaces are planned for the GitLab Kubernetes Agent. Provide more feedback in the related epic.
Upgrades and version compatibility
The GitLab Kubernetes Agent is comprised of two major components: agentk and kas.
As we provide kas installers built into the various GitLab installation methods, the required kas version corresponds to the GitLab major.minor (X.Y) versions.
At the same time, agentk and kas can differ by 1 minor version in either direction. For example,
agentk 14.4 supports kas 14.3, 14.4, and 14.5 (regardless of the patch).
A feature introduced in a given GitLab minor version might work with other agentk or kas versions.
To make sure that it works, use at least the same agentk and kas minor version. For example,
if your GitLab version is 14.2, use at least agentk 14.2 and kas 14.2.
We recommend upgrading your kas installations together with GitLab instances' upgrades, and to upgrade the agentk installations after upgrading GitLab.
The available agentk and kas versions can be found in
the container registry.