3.8 KiB
| stage | group | info |
|---|---|---|
| Ecosystem | Integrations | To determine the technical writer assigned to the Stage/Group associated with this page, see https://about.gitlab.com/handbook/engineering/ux/technical-writing/#assignments |
Set up a development environment (FREE)
The following are required to install and test the app:
-
A Jira Cloud instance. Atlassian provides free instances for development and testing.
-
A GitLab instance available over the internet. For the app to work, Jira Cloud should be able to connect to the GitLab instance through the internet. For this we recommend using Gitpod or a similar cloud development environment. For more information on using Gitpod with GDK, see the:
- GDK in Gitpod video.
- GDK with Gitpod documentation.
You must not use tunneling tools such as Serveo or
ngrok. These are security risks, and must not be run on developer laptops.Jira requires all connections to the app host to be over SSL. If you set up your own environment, remember to enable SSL and an appropriate certificate.
Install the app in Jira
To install the app in Jira:
-
Enable Jira development mode to install apps that are not from the Atlassian Marketplace:
- In Jira, navigate to Jira settings > Apps > Manage apps.
- Scroll to the bottom of the Manage apps page and click Settings.
- Select Enable development mode and click Apply.
-
Install the app:
-
In Jira, navigate to Jira settings > Apps > Manage apps.
-
Click Upload app.
-
In the From this URL field, provide a link to the app descriptor. The host and port must point to your GitLab instance.
For example:
https://xxxx.gitpod.io/-/jira_connect/app_descriptor.json -
Click Upload.
If the install was successful, you should see the GitLab for Jira app under Manage apps. You can also click Getting Started to open the configuration page rendered from your GitLab instance.
Note that any changes to the app descriptor requires you to uninstall then reinstall the app.
-
Troubleshooting
If the app install failed, you might need to delete jira_connect_installations from your database.
- Open the database console.
- Run
TRUNCATE TABLE jira_connect_installations CASCADE;.
Add a namespace
To add a namespace to Jira:
-
Make sure you are logged in on your GitLab development instance.
-
On the GitLab app page in Jira, click Get started.
-
Open your browser's developer tools and navigate to the Network tab.
-
Try to add the namespace in Jira.
-
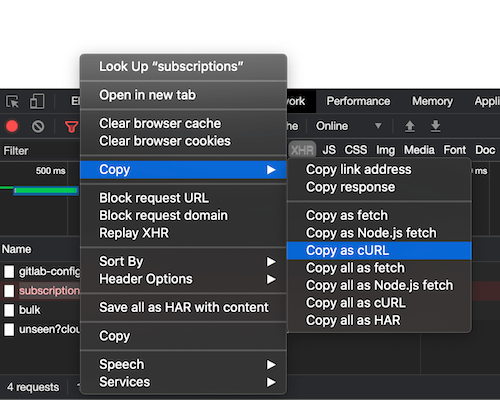
If the request fails with 401 "not authorized", copy the request as a cURL command and paste it in your terminal.
-
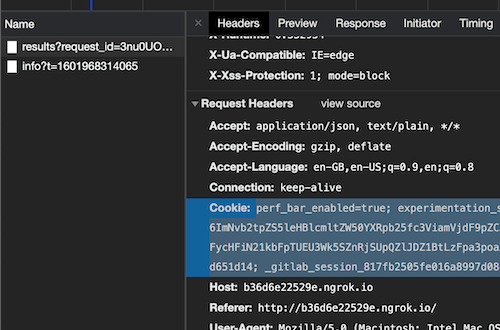
Go to your development instance (usually at: http://localhost:3000), open developer tools, navigate to the Network tab and reload the page.
-
Copy all cookies from the first request.
-
Append the cookies to the cURL command in your terminal:
--cookies "<cookies from the request>". -
Submit the cURL request.
-
If the response is
{"success":true}, the namespace was added. -
Append the cookies to the cURL command in your terminal
--cookies "PASTE COOKIES HERE". -
Submit the cURL request.
-
If the response is
{"success":true}the namespace was added.

