42 KiB
| stage | group | info | type |
|---|---|---|---|
| Create | Gitaly | To determine the technical writer assigned to the Stage/Group associated with this page, see https://about.gitlab.com/handbook/engineering/ux/technical-writing/#designated-technical-writers | reference |
Gitaly
Gitaly is the service that provides high-level RPC access to Git repositories. Without it, no GitLab components can read or write Git data.
In the Gitaly documentation:
- Gitaly server refers to any node that runs Gitaly itself.
- Gitaly client refers to any node that runs a process that makes requests of the Gitaly server. Processes include, but are not limited to:
GitLab end users do not have direct access to Gitaly.
CAUTION: Caution: From GitLab 13.0, using NFS for Git repositories is deprecated. In GitLab 14.0, support for NFS for Git repositories is scheduled to be removed. Upgrade to Gitaly Cluster as soon as possible.
Architecture
The following is a high-level architecture overview of how Gitaly is used.

Configure Gitaly
The Gitaly service itself is configured via a TOML configuration file.
To change Gitaly settings:
For Omnibus GitLab
- Edit
/etc/gitlab/gitlab.rband add or change the Gitaly settings. - Save the file and reconfigure GitLab.
For installations from source
- Edit
/home/git/gitaly/config.tomland add or change the Gitaly settings. - Save the file and restart GitLab.
Run Gitaly on its own server
By default, Gitaly is run on the same server as Gitaly clients and is configured as above. Single-server installations are best served by this default configuration used by:
- Omnibus GitLab.
- The GitLab source installation guide.
However, Gitaly can be deployed to its own server, which can benefit GitLab installations that span multiple machines.
NOTE: Note: When configured to run on their own servers, Gitaly servers must be upgraded before Gitaly clients in your cluster.
The process for setting up Gitaly on its own server is:
When running Gitaly on its own server, note the following regarding GitLab versions:
- From GitLab 11.4, Gitaly was able to serve all Git requests without requiring a shared NFS mount for Git repository data, except for the Elasticsearch indexer.
- From GitLab 11.8, the Elasticsearch indexer uses Gitaly for data access as well. NFS can still be leveraged for redundancy on block-level Git data, but only has to be mounted on the Gitaly servers.
- From GitLab 11.8 to 12.2, it is possible to use Elasticsearch in a Gitaly setup that doesn't use NFS. In order to use Elasticsearch in these versions, the repository indexer must be enabled in your GitLab configuration.
- Since GitLab 12.3, the new indexer is the default and no configuration is required.
Network architecture
The following list depicts the network architecture of Gitaly:
- GitLab Rails shards repositories into repository storages.
/config/gitlab.ymlcontains a map from storage names to(Gitaly address, Gitaly token)pairs.- The
storage name->(Gitaly address, Gitaly token)map in/config/gitlab.ymlis the single source of truth for the Gitaly network topology. - A
(Gitaly address, Gitaly token)corresponds to a Gitaly server. - A Gitaly server hosts one or more storages.
- A Gitaly client can use one or more Gitaly servers.
- Gitaly addresses must be specified in such a way that they resolve correctly for all Gitaly clients.
- Gitaly clients are:
- Puma or Unicorn.
- Sidekiq.
- GitLab Workhorse.
- GitLab Shell.
- Elasticsearch indexer.
- Gitaly itself.
- A Gitaly server must be able to make RPC calls to itself via its own
(Gitaly address, Gitaly token)pair as specified in/config/gitlab.yml. - Authentication is done through a static token which is shared among the Gitaly and GitLab Rails nodes.
DANGER: Danger: Gitaly servers must not be exposed to the public internet as Gitaly's network traffic is unencrypted by default. The use of firewall is highly recommended to restrict access to the Gitaly server. Another option is to use TLS.
In the following sections, we describe how to configure two Gitaly servers with secret token
abc123secret:
gitaly1.internal.gitaly2.internal.
We assume your GitLab installation has three repository storages:
default.storage1.storage2.
You can use as few as one server with one repository storage if desired.
NOTE: Note: The token referred to throughout the Gitaly documentation is just an arbitrary password selected by the administrator. It is unrelated to tokens created for the GitLab API or other similar web API tokens.
Install Gitaly
Install Gitaly on each Gitaly server using either Omnibus GitLab or install it from source:
- For Omnibus GitLab, download and install the Omnibus GitLab
package you want but do not provide the
EXTERNAL_URL=value. - To install from source, follow the steps at Install Gitaly.
Configure authentication
Gitaly and GitLab use two shared secrets for authentication:
- One to authenticate gRPC requests to Gitaly.
- A second for authentication callbacks from GitLab Shell to the GitLab internal API.
For Omnibus GitLab
To configure the Gitaly token:
-
On the Gitaly clients, edit
/etc/gitlab/gitlab.rb:gitlab_rails['gitaly_token'] = 'abc123secret' -
Save the file and reconfigure GitLab.
-
On the Gitaly server, edit
/etc/gitlab/gitlab.rb:gitaly['auth_token'] = 'abc123secret'
There are two ways to configure the GitLab Shell token.
Method 1:
- Copy
/etc/gitlab/gitlab-secrets.jsonfrom the Gitaly client to same path on the Gitaly servers (and any other Gitaly clients). - Reconfigure GitLab on Gitaly servers.
Method 2:
-
On the Gitaly clients, edit
/etc/gitlab/gitlab.rb:gitlab_shell['secret_token'] = 'shellsecret' -
Save the file and reconfigure GitLab.
-
On the Gitaly servers, edit
/etc/gitlab/gitlab.rb:gitlab_shell['secret_token'] = 'shellsecret'
For installations from source
-
Copy
/home/git/gitlab/.gitlab_shell_secretfrom the Gitaly client to the same path on the Gitaly servers (and any other Gitaly clients). -
On the Gitaly clients, edit
/home/git/gitlab/config/gitlab.yml:gitlab: gitaly: token: 'abc123secret' -
Save the file and restart GitLab.
-
On the Gitaly servers, edit
/home/git/gitaly/config.toml:[auth] token = 'abc123secret' -
Save the file and restart GitLab.
Configure Gitaly servers
On the Gitaly servers, you must configure storage paths and enable the network listener.
If you want to reduce the risk of downtime when you enable authentication, you can temporarily disable enforcement. For more information, see the documentation on configuring Gitaly authentication.
For Omnibus GitLab
-
Edit
/etc/gitlab/gitlab.rb:# /etc/gitlab/gitlab.rb # Avoid running unnecessary services on the Gitaly server postgresql['enable'] = false redis['enable'] = false nginx['enable'] = false puma['enable'] = false sidekiq['enable'] = false gitlab_workhorse['enable'] = false grafana['enable'] = false gitlab_exporter['enable'] = false # If you run a separate monitoring node you can disable these services alertmanager['enable'] = false prometheus['enable'] = false # If you don't run a separate monitoring node you can # enable Prometheus access & disable these extra services. # This makes Prometheus listen on all interfaces. You must use firewalls to restrict access to this address/port. # prometheus['listen_address'] = '0.0.0.0:9090' # prometheus['monitor_kubernetes'] = false # If you don't want to run monitoring services uncomment the following (not recommended) # node_exporter['enable'] = false # Prevent database connections during 'gitlab-ctl reconfigure' gitlab_rails['rake_cache_clear'] = false gitlab_rails['auto_migrate'] = false # Configure the gitlab-shell API callback URL. Without this, `git push` will # fail. This can be your 'front door' GitLab URL or an internal load # balancer. # Don't forget to copy `/etc/gitlab/gitlab-secrets.json` from Gitaly client to Gitaly server. gitlab_rails['internal_api_url'] = 'https://gitlab.example.com' # Make Gitaly accept connections on all network interfaces. You must use # firewalls to restrict access to this address/port. # Comment out following line if you only want to support TLS connections gitaly['listen_addr'] = "0.0.0.0:8075" -
Append the following to
/etc/gitlab/gitlab.rbfor each respective Gitaly server:On
gitaly1.internal:git_data_dirs({ 'default' => { 'path' => '/var/opt/gitlab/git-data' }, 'storage1' => { 'path' => '/mnt/gitlab/git-data' }, })On
gitaly2.internal:git_data_dirs({ 'storage2' => { 'path' => '/srv/gitlab/git-data' }, }) -
Save the file and reconfigure GitLab.
-
Run
sudo /opt/gitlab/embedded/service/gitlab-shell/bin/check -config /opt/gitlab/embedded/service/gitlab-shell/config.ymlto confirm that Gitaly can perform callbacks to the GitLab internal API.
For installations from source
-
Edit
/home/git/gitaly/config.toml:listen_addr = '0.0.0.0:8075' internal_socket_dir = '/var/opt/gitlab/gitaly' [logging] format = 'json' level = 'info' dir = '/var/log/gitaly' -
Append the following to
/home/git/gitaly/config.tomlfor each respective Gitaly server:On
gitaly1.internal:[[storage]] name = 'default' path = '/var/opt/gitlab/git-data/repositories' [[storage]] name = 'storage1' path = '/mnt/gitlab/git-data/repositories'On
gitaly2.internal:[[storage]] name = 'storage2' path = '/srv/gitlab/git-data/repositories' -
Edit
/home/git/gitlab-shell/config.yml:gitlab_url: https://gitlab.example.com -
Save the files and restart GitLab.
-
Run
sudo -u git /home/git/gitlab-shell/bin/check -config /home/git/gitlab-shell/config.ymlto confirm that Gitaly can perform callbacks to the GitLab internal API.
Configure Gitaly clients
As the final step, you must update Gitaly clients to switch from using local Gitaly service to use the Gitaly servers you just configured.
This can be risky because anything that prevents your Gitaly clients from reaching the Gitaly servers will cause all Gitaly requests to fail. For example, any sort of network, firewall, or name resolution problems.
Additionally, you must disable Rugged if previously enabled manually.
Gitaly makes the following assumptions:
- Your
gitaly1.internalGitaly server can be reached atgitaly1.internal:8075from your Gitaly clients, and that Gitaly server can read and write to/mnt/gitlab/defaultand/mnt/gitlab/storage1. - Your
gitaly2.internalGitaly server can be reached atgitaly2.internal:8075from your Gitaly clients, and that Gitaly server can read and write to/mnt/gitlab/storage2. - Your
gitaly1.internalandgitaly2.internalGitaly servers can reach each other.
Note you can't a use mixed setup, with at least one of your Gitaly servers configured as a local
server with the path setting provided. This is because other Gitaly instances can't communicate
with it. The following setup is incorrect, because:
- You must replace
pathwithgitaly_addresscontaining a proper value. - The address must be reachable from the other two addresses provided.
git_data_dirs({
  'default' => { 'gitaly_address' => 'tcp://gitaly1.internal:8075' },
  'storage1' => { 'path' => '/var/opt/gitlab/git-data' },
  'storage2' => { 'gitaly_address' => 'tcp://gitaly2.internal:8075' },
})
For Omnibus GitLab
-
Edit
/etc/gitlab/gitlab.rb:git_data_dirs({ 'default' => { 'gitaly_address' => 'tcp://gitaly1.internal:8075' }, 'storage1' => { 'gitaly_address' => 'tcp://gitaly1.internal:8075' }, 'storage2' => { 'gitaly_address' => 'tcp://gitaly2.internal:8075' }, }) -
Save the file and reconfigure GitLab.
-
Run
sudo gitlab-rake gitlab:gitaly:checkto confirm the Gitaly client can connect to Gitaly servers. -
Tail the logs to see the requests:
sudo gitlab-ctl tail gitaly
For installations from source
-
Edit
/home/git/gitlab/config/gitlab.yml:gitlab: repositories: storages: default: gitaly_address: tcp://gitaly1.internal:8075 path: /some/dummy/path storage1: gitaly_address: tcp://gitaly1.internal:8075 path: /some/dummy/path storage2: gitaly_address: tcp://gitaly2.internal:8075 path: /some/dummy/pathNOTE: Note:
/some/dummy/pathshould be set to a local folder that exists, however no data will be stored in this folder. This will no longer be necessary after this issue is resolved. -
Save the file and restart GitLab.
-
Run
sudo -u git -H bundle exec rake gitlab:gitaly:check RAILS_ENV=productionto confirm the Gitaly client can connect to Gitaly servers. -
Tail the logs to see the requests:
tail -f /home/git/gitlab/log/gitaly.log
When you tail the Gitaly logs on your Gitaly server, you should see requests coming in. One sure way to trigger a Gitaly request is to clone a repository from GitLab over HTTP or HTTPS.
DANGER: Danger: If you have server hooks configured, either per repository or globally, you must move these to the Gitaly servers. If you have multiple Gitaly servers, copy your server hooks to all Gitaly servers.
Disabling the Gitaly service in a cluster environment
If you are running Gitaly as a remote service you may want to disable the local Gitaly service that runs on your GitLab server by default. Disabling Gitaly only makes sense when you run GitLab in a custom cluster configuration, where different services run on different machines. Disabling Gitaly on all machines in the cluster is not a valid configuration.
To disable Gitaly on a GitLab server:
For Omnibus GitLab
-
Edit
/etc/gitlab/gitlab.rb:gitaly['enable'] = false -
Save the file and reconfigure GitLab.
For installations from source
-
Edit
/etc/default/gitlab:gitaly_enabled=false -
Save the file and restart GitLab.
TLS support
Introduced in GitLab 11.8.
Gitaly supports TLS encryption. To be able to communicate
with a Gitaly instance that listens for secure connections you will need to use tls:// URL
scheme in the gitaly_address of the corresponding storage entry in the GitLab configuration.
You will need to bring your own certificates as this isn't provided automatically. The certificate corresponding to each Gitaly server will need to be installed on that Gitaly server.
Additionally the certificate, or its certificate authority, must be installed on all Gitaly servers (including the Gitaly server using the certificate) and on all Gitaly clients that communicate with it following the procedure described in GitLab custom certificate configuration (and repeated below).
NOTE: Note The certificate must specify the address you use to access the Gitaly server. If you are addressing the Gitaly server by a hostname, you can either use the Common Name field for this, or add it as a Subject Alternative Name. If you are addressing the Gitaly server by its IP address, you must add it as a Subject Alternative Name to the certificate. gRPC does not support using an IP address as Common Name in a certificate.
NOTE: Note:
It is possible to configure Gitaly servers with both an
unencrypted listening address listen_addr and an encrypted listening
address tls_listen_addr at the same time. This allows you to do a
gradual transition from unencrypted to encrypted traffic, if necessary.
To configure Gitaly with TLS:
For Omnibus GitLab
-
Create certificates for Gitaly servers.
-
On the Gitaly clients, copy the certificates, or their certificate authority, into the
/etc/gitlab/trusted-certs:sudo cp cert.pem /etc/gitlab/trusted-certs/ -
On the Gitaly clients, edit
git_data_dirsin/etc/gitlab/gitlab.rbas follows:git_data_dirs({ 'default' => { 'gitaly_address' => 'tls://gitaly1.internal:9999' }, 'storage1' => { 'gitaly_address' => 'tls://gitaly1.internal:9999' }, 'storage2' => { 'gitaly_address' => 'tls://gitaly2.internal:9999' }, }) -
Save the file and reconfigure GitLab.
-
On the Gitaly servers, create the
/etc/gitlab/ssldirectory and copy your key and certificate there:sudo mkdir -p /etc/gitlab/ssl sudo chmod 755 /etc/gitlab/ssl sudo cp key.pem cert.pem /etc/gitlab/ssl/ sudo chmod 644 key.pem cert.pem -
Copy all Gitaly server certificates, or their certificate authority, to
/etc/gitlab/trusted-certsso Gitaly server will trust the certificate when calling into itself or other Gitaly servers:sudo cp cert1.pem cert2.pem /etc/gitlab/trusted-certs/ -
Edit
/etc/gitlab/gitlab.rband add:gitaly['tls_listen_addr'] = "0.0.0.0:9999" gitaly['certificate_path'] = "/etc/gitlab/ssl/cert.pem" gitaly['key_path'] = "/etc/gitlab/ssl/key.pem" -
Save the file and reconfigure GitLab.
-
(Optional) After verifying that all Gitaly traffic is being served over TLS, you can improve security by disabling non-TLS connections by commenting out or deleting
gitaly['listen_addr']in/etc/gitlab/gitlab.rb, saving the file, and reconfiguring GitLab.
For installations from source
-
Create certificates for Gitaly servers.
-
On the Gitaly clients, copy the certificates into the system trusted certificates:
sudo cp cert.pem /usr/local/share/ca-certificates/gitaly.crt sudo update-ca-certificates -
On the Gitaly clients, edit
storagesin/home/git/gitlab/config/gitlab.ymlas follows:gitlab: repositories: storages: default: gitaly_address: tls://gitaly1.internal:9999 path: /some/dummy/path storage1: gitaly_address: tls://gitaly1.internal:9999 path: /some/dummy/path storage2: gitaly_address: tls://gitaly2.internal:9999 path: /some/dummy/pathNOTE: Note:
/some/dummy/pathshould be set to a local folder that exists, however no data will be stored in this folder. This will no longer be necessary after this issue is resolved. -
Save the file and restart GitLab.
-
On the Gitaly servers, create or edit
/etc/default/gitlaband add:export SSL_CERT_DIR=/etc/gitlab/ssl -
On the Gitaly servers, create the
/etc/gitlab/ssldirectory and copy your key and certificate there:sudo mkdir -p /etc/gitlab/ssl sudo chmod 755 /etc/gitlab/ssl sudo cp key.pem cert.pem /etc/gitlab/ssl/ sudo chmod 644 key.pem cert.pem -
Copy all Gitaly server certificates, or their certificate authority, to the system trusted certificates so Gitaly server will trust the certificate when calling into itself or other Gitaly servers.
sudo cp cert.pem /usr/local/share/ca-certificates/gitaly.crt sudo update-ca-certificates -
Edit
/home/git/gitaly/config.tomland add:tls_listen_addr = '0.0.0.0:9999' [tls] certificate_path = '/etc/gitlab/ssl/cert.pem' key_path = '/etc/gitlab/ssl/key.pem' -
Save the file and restart GitLab.
-
(Optional) After verifying that all Gitaly traffic is being served over TLS, you can improve security by disabling non-TLS connections by commenting out or deleting
listen_addrin/home/git/gitaly/config.toml, saving the file, and restarting GitLab.
Observe type of Gitaly connections
To observe what type of connections are actually being used in a production environment you can use the following Prometheus query:
sum(rate(gitaly_connections_total[5m])) by (type)
gitaly-ruby
Gitaly was developed to replace the Ruby application code in GitLab.
In order to save time and/or avoid the risk of rewriting existing
application logic, in some cases we chose to copy some application code
from GitLab into Gitaly almost as-is. To be able to run that code,
gitaly-ruby was created, which is a "sidecar" process for the main Gitaly Go
process. Some examples of things that are implemented in gitaly-ruby are
RPCs that deal with wikis, and RPCs that create commits on behalf of
a user, such as merge commits.
Number of gitaly-ruby workers
gitaly-ruby has much less capacity than Gitaly itself. If your Gitaly
server has to handle a lot of requests, the default setting of having
just one active gitaly-ruby sidecar might not be enough. If you see
ResourceExhausted errors from Gitaly, it's very likely that you have not
enough gitaly-ruby capacity.
You can increase the number of gitaly-ruby processes on your Gitaly
server with the following settings.
For Omnibus GitLab
-
Edit
/etc/gitlab/gitlab.rb:# Default is 2 workers. The minimum is 2; 1 worker is always reserved as # a passive stand-by. gitaly['ruby_num_workers'] = 4 -
Save the file and reconfigure GitLab.
For installations from source
-
Edit
/home/git/gitaly/config.toml:[gitaly-ruby] num_workers = 4 -
Save the file and restart GitLab.
Limiting RPC concurrency
It can happen that CI clone traffic puts a large strain on your Gitaly service. The bulk of the work gets done in the SSHUploadPack (for Git SSH) and PostUploadPack (for Git HTTP) RPC's. To prevent such workloads from overcrowding your Gitaly server you can set concurrency limits in Gitaly's configuration file.
# in /etc/gitlab/gitlab.rb

gitaly['concurrency'] = [
  {
    'rpc' => "/gitaly.SmartHTTPService/PostUploadPack",
    'max_per_repo' => 20
  },
  {
    'rpc' => "/gitaly.SSHService/SSHUploadPack",
    'max_per_repo' => 20
  }
]
This will limit the number of in-flight RPC calls for the given RPC's.
The limit is applied per repository. In the example above, each on the
Gitaly server can have at most 20 simultaneous PostUploadPack calls in
flight, and the same for SSHUploadPack. If another request comes in for
a repository that has used up its 20 slots, that request will get
queued.
You can observe the behavior of this queue via the Gitaly logs and via
Prometheus. In the Gitaly logs, you can look for the string (or
structured log field) acquire_ms. Messages that have this field are
reporting about the concurrency limiter. In Prometheus, look for the
gitaly_rate_limiting_in_progress, gitaly_rate_limiting_queued and
gitaly_rate_limiting_seconds metrics.
The name of the Prometheus metric is not quite right because this is a concurrency limiter, not a rate limiter. If a Gitaly client makes 1000 requests in a row in a very short timespan, the concurrency will not exceed 1, and this mechanism (the concurrency limiter) will do nothing.
Rotating a Gitaly authentication token
Rotating credentials in a production environment often either requires downtime, or causes outages, or both. If you are careful, though, you can rotate Gitaly credentials without a service interruption.
This procedure also works if you are running GitLab on a single server. In that case, "Gitaly server" and "Gitaly client" refers to the same machine.
1. Monitor current authentication behavior
Use Prometheus to see what the current authentication behavior of your GitLab installation is.
sum(rate(gitaly_authentications_total[5m])) by (enforced, status)
In a system where authentication is configured correctly, and where you have live traffic, you will see something like this:
{enforced="true",status="ok"} 4424.985419441742
There may also be other numbers with rate 0. We only care about the non-zero numbers.
The only non-zero number should have enforced="true",status="ok". If
you have other non-zero numbers, something is wrong in your
configuration.
The status="ok" number reflects your current request rate. In the example
above, Gitaly is handling about 4000 requests per second.
Now you have established that you can monitor the Gitaly authentication behavior of your GitLab installation.
2. Reconfigure all Gitaly servers to be in "auth transitioning" mode
The second step is to temporarily disable authentication on the Gitaly servers.
# in /etc/gitlab/gitlab.rb
gitaly['auth_transitioning'] = true
After you have applied this, your Prometheus query should return something like this:
{enforced="false",status="would be ok"} 4424.985419441742
Because enforced="false", it will be safe to start rolling out the new
token.
3. Update Gitaly token on all clients and servers
# in /etc/gitlab/gitlab.rb

gitaly['auth_token'] = 'my new secret token'
Remember to apply this on both your Gitaly clients and servers. If you
check your Prometheus query while this change is being rolled out, you
will see non-zero values for the enforced="false",status="denied" counter.
4. Use Prometheus to ensure there are no authentication failures
After you applied the Gitaly token change everywhere, and all services
involved have been restarted, you should will temporarily see a mix of
status="would be ok" and status="denied".
After the new token has been picked up by all Gitaly clients and
servers, the only non-zero rate should be
enforced="false",status="would be ok".
5. Disable "auth transitioning" Mode
Now we turn off the 'auth transitioning' mode. These final steps are important: without them, you have no authentication.
Update the configuration on your Gitaly servers:
# in /etc/gitlab/gitlab.rb
gitaly['auth_transitioning'] = false
6. Verify that authentication is enforced again
Refresh your Prometheus query. You should now see the same kind of result as you did in the beginning:
{enforced="true",status="ok"} 4424.985419441742
Note that enforced="true", meaning that authentication is being enforced.
Direct Git access in GitLab Rails
Also known as "the Rugged patches".
History
Before Gitaly existed, the things that are now Gitaly clients used to access Git repositories directly. Either on a local disk in the case of e.g. a single-machine Omnibus GitLab installation, or via NFS in the case of a horizontally scaled GitLab installation.
Besides running plain git commands, in GitLab Rails we also used to
use a Ruby gem (library) called
Rugged. Rugged is a wrapper around
libgit2, a stand-alone implementation of Git in
the form of a C library.
Over time it has become clear to use that Rugged, and particularly Rugged in combination with the Unicorn web server, is extremely efficient. Because libgit2 is a library and not an external process, there was very little overhead between GitLab application code that tried to look up data in Git repositories, and the Git implementation itself.
Because Rugged+Unicorn was so efficient, GitLab's application code ended
up with lots of duplicate Git object lookups (like looking up the
master commit a dozen times in one request). We could write
inefficient code without being punished for it.
When we migrated these Git lookups to Gitaly calls, we were suddenly
getting a much higher fixed cost per Git lookup. Even when Gitaly is
able to re-use an already-running git process to look up e.g. a commit
you still have the cost of a network roundtrip to Gitaly, and within
Gitaly a write/read roundtrip on the Unix pipes that connect Gitaly to
the git process.
Using GitLab.com performance as our yardstick, we pushed down the number of Gitaly calls per request until the loss of Rugged's efficiency was no longer felt. It also helped that we run Gitaly itself directly on the Git file severs, rather than via NFS mounts: this gave us a speed boost that counteracted the negative effect of not using Rugged anymore.
Unfortunately, some other deployments of GitLab could not ditch NFS like we did on GitLab.com and they got the worst of both worlds: the slowness of NFS and the increased inherent overhead of Gitaly.
As a performance band-aid for these stuck-on-NFS deployments, we re-introduced some of the old Rugged code that got deleted from GitLab Rails during the Gitaly migration project. These pieces of re-introduced code are informally referred to as "the Rugged patches".
Activation of direct Git access in GitLab Rails
The Ruby methods that perform direct Git access are hidden behind feature flags. These feature flags are off by default. It is not good if you need to know about feature flags to get the best performance so in a second iteration, we added an automatic mechanism that will enable direct Git access.
When GitLab Rails calls a function that has a Rugged patch it performs two checks. The result of both of these checks is cached.
- Is the feature flag for this patch set in the database? If so, do what the feature flag says.
- If the feature flag is not set (i.e. neither true nor false), try to see if we can access filesystem underneath the Gitaly server directly. If so, use the Rugged patch.
To see if GitLab Rails can access the repository filesystem directly, we use the following heuristic:
- Gitaly ensures that the filesystem has a metadata file in its root with a UUID in it.
- Gitaly reports this UUID to GitLab Rails via the
ServerInfoRPC. - GitLab Rails tries to read the metadata file directly. If it exists, and if the UUID's match, assume we have direct access.
Because of the way the UUID check works, and because Omnibus GitLab will
fill in the correct repository paths in the GitLab Rails config file
config/gitlab.yml, direct Git access in GitLab Rails is on by default in
Omnibus.
Plans to remove direct Git access in GitLab Rails
For the sake of removing complexity it is desirable that we get rid of direct Git access in GitLab Rails. For as long as some GitLab installations are stuck with Git repositories on slow NFS, however, we cannot just remove them.
There are two prongs to our efforts to remove direct Git access in GitLab Rails:
- Reduce the number of (inefficient) Gitaly queries made by GitLab Rails.
- Persuade everybody who runs a Highly Available / horizontally scaled GitLab installation to move off of NFS.
The second prong is the only real solution. For this we need Gitaly HA, which is still under development as of December 2019.
Troubleshooting Gitaly
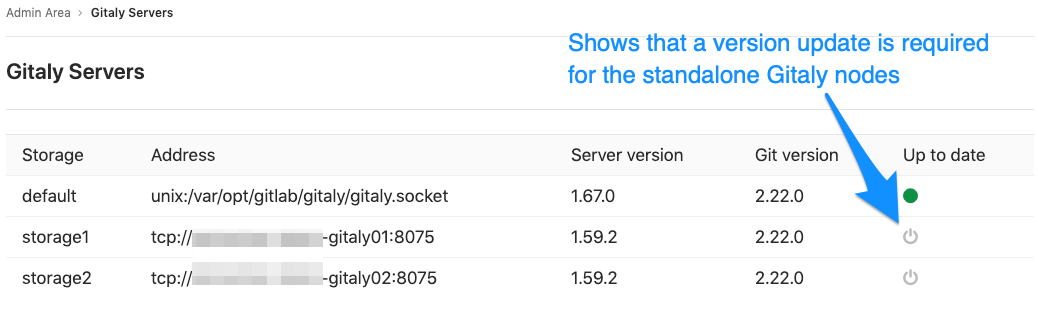
Checking versions when using standalone Gitaly servers
When using standalone Gitaly servers, you must make sure they are the same version
as GitLab to ensure full compatibility. Check Admin Area > Gitaly Servers on
your GitLab instance and confirm all Gitaly Servers are Up to date.
gitaly-debug
The gitaly-debug command provides "production debugging" tools for Gitaly and Git
performance. It is intended to help production engineers and support
engineers investigate Gitaly performance problems.
If you're using GitLab 11.6 or newer, this tool should be installed on
your GitLab / Gitaly server already at /opt/gitlab/embedded/bin/gitaly-debug.
If you're investigating an older GitLab version you can compile this
tool offline and copy the executable to your server:
git clone https://gitlab.com/gitlab-org/gitaly.git
cd cmd/gitaly-debug
GOOS=linux GOARCH=amd64 go build -o gitaly-debug
To see the help page of gitaly-debug for a list of supported sub-commands, run:
gitaly-debug -h
Commits, pushes, and clones return a 401
remote: GitLab: 401 Unauthorized
You will need to sync your gitlab-secrets.json file with your Gitaly clients (GitLab
app nodes).
Client side gRPC logs
Gitaly uses the gRPC RPC framework. The Ruby gRPC
client has its own log file which may contain useful information when
you are seeing Gitaly errors. You can control the log level of the
gRPC client with the GRPC_LOG_LEVEL environment variable. The
default level is WARN.
You can run a gRPC trace with:
sudo GRPC_TRACE=all GRPC_VERBOSITY=DEBUG gitlab-rake gitlab:gitaly:check
Observing gitaly-ruby traffic
gitaly-ruby is an internal implementation detail of Gitaly,
so, there's not that much visibility into what goes on inside
gitaly-ruby processes.
If you have Prometheus set up to scrape your Gitaly process, you can see
request rates and error codes for individual RPCs in gitaly-ruby by
querying grpc_client_handled_total. Strictly speaking, this metric does
not differentiate between gitaly-ruby and other RPCs, but in practice
(as of GitLab 11.9), all gRPC calls made by Gitaly itself are internal
calls from the main Gitaly process to one of its gitaly-ruby sidecars.
Assuming your grpc_client_handled_total counter only observes Gitaly,
the following query shows you RPCs are (most likely) internally
implemented as calls to gitaly-ruby:
sum(rate(grpc_client_handled_total[5m])) by (grpc_method) > 0
Repository changes fail with a 401 Unauthorized error
If you're running Gitaly on its own server and notice that users can
successfully clone and fetch repositories (via both SSH and HTTPS), but can't
push to them or make changes to the repository in the web UI without getting a
401 Unauthorized message, then it's possible Gitaly is failing to authenticate
with the Gitaly client due to having the wrong secrets file.
Confirm the following are all true:
-
When any user performs a
git pushto any repository on this Gitaly server, it fails with the following error (note the401 Unauthorized):remote: GitLab: 401 Unauthorized To <REMOTE_URL> ! [remote rejected] branch-name -> branch-name (pre-receive hook declined) error: failed to push some refs to '<REMOTE_URL>' -
When any user adds or modifies a file from the repository using the GitLab UI, it immediately fails with a red
401 Unauthorizedbanner. -
Creating a new project and initializing it with a README successfully creates the project but doesn't create the README.
-
When tailing the logs on a Gitaly client and reproducing the error, you get
401errors when reaching the/api/v4/internal/allowedendpoint:# api_json.log { "time": "2019-07-18T00:30:14.967Z", "severity": "INFO", "duration": 0.57, "db": 0, "view": 0.57, "status": 401, "method": "POST", "path": "\/api\/v4\/internal\/allowed", "params": [ { "key": "action", "value": "git-receive-pack" }, { "key": "changes", "value": "REDACTED" }, { "key": "gl_repository", "value": "REDACTED" }, { "key": "project", "value": "\/path\/to\/project.git" }, { "key": "protocol", "value": "web" }, { "key": "env", "value": "{\"GIT_ALTERNATE_OBJECT_DIRECTORIES\":[],\"GIT_ALTERNATE_OBJECT_DIRECTORIES_RELATIVE\":[],\"GIT_OBJECT_DIRECTORY\":null,\"GIT_OBJECT_DIRECTORY_RELATIVE\":null}" }, { "key": "user_id", "value": "2" }, { "key": "secret_token", "value": "[FILTERED]" } ], "host": "gitlab.example.com", "ip": "REDACTED", "ua": "Ruby", "route": "\/api\/:version\/internal\/allowed", "queue_duration": 4.24, "gitaly_calls": 0, "gitaly_duration": 0, "correlation_id": "XPUZqTukaP3" } # nginx_access.log [IP] - - [18/Jul/2019:00:30:14 +0000] "POST /api/v4/internal/allowed HTTP/1.1" 401 30 "" "Ruby"
To fix this problem, confirm that your gitlab-secrets.json file
on the Gitaly server matches the one on Gitaly client. If it doesn't match,
update the secrets file on the Gitaly server to match the Gitaly client, then
reconfigure.
Command line tools cannot connect to Gitaly
If you are having trouble connecting to a Gitaly server with command line (CLI) tools,
and certain actions result in a 14: Connect Failed error message,
it means that gRPC cannot reach your Gitaly server.
Verify that you can reach Gitaly via TCP:
sudo gitlab-rake gitlab:tcp_check[GITALY_SERVER_IP,GITALY_LISTEN_PORT]
If the TCP connection fails, check your network settings and your firewall rules. If the TCP connection succeeds, your networking and firewall rules are correct.
If you use proxy servers in your command line environment, such as Bash, these can interfere with your gRPC traffic.
If you use Bash or a compatible command line environment, run the following commands to determine whether you have proxy servers configured:
echo $http_proxy
echo $https_proxy
If either of these variables have a value, your Gitaly CLI connections may be getting routed through a proxy which cannot connect to Gitaly.
To remove the proxy setting, run the following commands (depending on which variables had values):
unset http_proxy
unset https_proxy
Gitaly not listening on new address after reconfiguring
When updating the gitaly['listen_addr'] or gitaly['prometheus_listen_addr']
values, Gitaly may continue to listen on the old address after a sudo gitlab-ctl reconfigure.
When this occurs, performing a sudo gitlab-ctl restart will resolve the issue. This will no longer be necessary after this issue is resolved.
Permission denied errors appearing in Gitaly logs when accessing repositories from a standalone Gitaly server
If this error occurs even though file permissions are correct, it's likely that the Gitaly server is experiencing clock drift.
Please ensure that the Gitaly clients and servers are synchronized and use an NTP time server to keep them synchronized if possible.
Praefect
Praefect is a router and transaction manager for Gitaly, and a required component for running a Gitaly Cluster. For more information see Gitaly Cluster.