12 KiB
| stage | group | info |
|---|---|---|
| Create | Ecosystem | To determine the technical writer assigned to the Stage/Group associated with this page, see https://about.gitlab.com/handbook/engineering/ux/technical-writing/#assignments |
OmniAuth
GitLab leverages OmniAuth to allow users to sign in using Twitter, GitHub, and other popular services. OmniAuth is "a generalized Rack framework for multiple-provider authentication, built on Ruby.
Configuring OmniAuth does not prevent standard GitLab authentication or LDAP (if configured) from continuing to work. Users can choose to sign in using any of the configured mechanisms.
- Initial OmniAuth Configuration
- Supported Providers
- Enable OmniAuth for an Existing User
- OmniAuth configuration sample when using Omnibus GitLab
- Enable or disable Sign In with an OmniAuth provider without disabling import sources
Supported Providers
This is a list of the current supported OmniAuth providers. Before proceeding on each provider's documentation, make sure to first read this document as it contains some settings that are common for all providers.
- GitHub
- Bitbucket
- GitLab.com
- Shibboleth
- SAML
- Crowd
- Azure
- Auth0
- Authentiq
- OAuth2Generic
- JWT
- OpenID Connect
- Salesforce
- AWS Cognito
Initial OmniAuth Configuration
Before configuring individual OmniAuth providers there are a few global settings that are in common for all providers that we need to consider.
NOTE: Starting from GitLab 11.4, OmniAuth is enabled by default. If you're using an earlier version, you must explicitly enable it.
allow_single_sign_onallows you to specify the providers you want to allow to automatically create an account. It defaults tofalse. Iffalseusers must be created manually or they can't sign in by using OmniAuth.auto_link_ldap_usercan be used if you have LDAP / ActiveDirectory integration enabled. It defaults tofalse. When enabled, users automatically created through an OmniAuth provider have their LDAP identity created in GitLab as well.block_auto_created_usersdefaults totrue. Iftrueauto created users will be blocked by default and must be unblocked by an administrator before they are able to sign in.
NOTE:
If you set block_auto_created_users to false, make sure to only
define providers under allow_single_sign_on that you are able to control, like
SAML, Shibboleth, Crowd, or Google. Otherwise, set it to false, or any user on
the Internet can successfully sign in to your GitLab without
administrative approval.
NOTE:
auto_link_ldap_user requires the uid of the user to be the same in both LDAP
and the OmniAuth provider.
To change these settings:
-
For Omnibus package
Open the configuration file:
sudo editor /etc/gitlab/gitlab.rband change:
# CAUTION! # This allows users to sign in without having a user account first. Define the allowed providers # using an array, for example, ["saml", "twitter"], or as true/false to allow all providers or none. # User accounts will be created automatically when authentication was successful. gitlab_rails['omniauth_allow_single_sign_on'] = ['saml', 'twitter'] gitlab_rails['omniauth_auto_link_ldap_user'] = true gitlab_rails['omniauth_block_auto_created_users'] = true -
For installations from source
Open the configuration file:
cd /home/git/gitlab

sudo -u git -H editor config/gitlab.yml
and change the following section:
## OmniAuth settings
omniauth:
  # Allow sign-in by using Twitter, Google, etc. using OmniAuth providers
  # Versions prior to 11.4 require this to be set to true
  # enabled: true

  # CAUTION!
  # This allows users to sign in without having a user account first. Define the allowed providers
  # using an array, for example, ["saml", "twitter"], or as true/false to allow all providers or none.
  # User accounts will be created automatically when authentication was successful.
  allow_single_sign_on: ["saml", "twitter"]

  auto_link_ldap_user: true

  # Locks down those users until they have been cleared by the admin (default: true).
  block_auto_created_users: true
Now we can choose one or more of the Supported Providers listed above to continue the configuration process.
Enable OmniAuth for an Existing User
Existing users can enable OmniAuth for specific providers after the account is created. For example, if the user originally signed in with LDAP, an OmniAuth provider such as Twitter can be enabled. Follow the steps below to enable an OmniAuth provider for an existing user.
- Sign in normally - whether standard sign in, LDAP, or another OmniAuth provider.
- In the top-right corner, select your avatar.
- Select Edit profile.
- In the left sidebar, select Account.
- In the Connected Accounts section, select the desired OmniAuth provider, such as Twitter.
- The user is redirected to the provider. After the user authorizes GitLab, they are redirected back to GitLab.
The chosen OmniAuth provider is now active and can be used to sign in to GitLab from then on.
Automatically Link Existing Users to OmniAuth Users
Introduced in GitLab 13.4.
You can automatically link OmniAuth users with existing GitLab users if their email addresses match. For example, the following setting is used to enable the auto link feature for both a SAML provider and the Twitter OAuth provider:
For Omnibus installations
gitlab_rails['omniauth_auto_link_user'] = ["saml", "twitter"]
For installations from source
omniauth:
  auto_link_user: ["saml", "twitter"]
Configure OmniAuth Providers as External
You can define which OmniAuth providers you want to be external. Users
creating accounts, or logging in by using these external providers cannot have
access to internal projects. You must use the full name of the provider,
like google_oauth2 for Google. Refer to the examples for the full names of the
supported providers.
NOTE: If you decide to remove an OmniAuth provider from the external providers list, you must manually update the users that use this method to sign in if you want their accounts to be upgraded to full internal accounts.
For Omnibus installations
gitlab_rails['omniauth_external_providers'] = ['twitter', 'google_oauth2']
For installations from source
omniauth:
  external_providers: ['twitter', 'google_oauth2']
Using Custom OmniAuth Providers
NOTE: The following information only applies for installations from source.
GitLab uses OmniAuth for authentication and already ships with a few providers pre-installed, such as LDAP, GitHub, and Twitter. You may also need to integrate with other authentication solutions. For these cases, you can use the OmniAuth provider.
Steps
These steps are fairly general and you must figure out the exact details from the OmniAuth provider's documentation.
-
Stop GitLab:
sudo service gitlab stop -
Add the gem to your
Gemfile:gem "omniauth-your-auth-provider" -
Install the new OmniAuth provider gem by running the following command:
sudo -u git -H bundle install --without development test mysql --path vendor/bundle --no-deploymentThese are the same commands you used during initial installation in the Install Gems section with
--path vendor/bundle --no-deploymentinstead of--deployment. -
Start GitLab:
sudo service gitlab start
Examples
If you have successfully set up a provider that is not shipped with GitLab itself, please let us know.
Share your experience in the public Wiki. You can help others by reporting successful configurations and probably share a few insights or provide warnings for common errors or pitfalls.
While we can't officially support every possible authentication mechanism out there, we'd like to at least help those with specific needs.
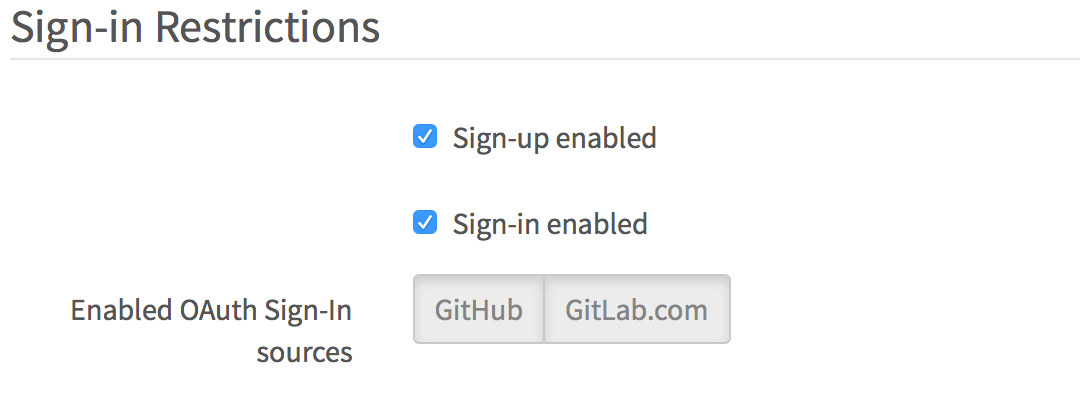
Enable or disable Sign In with an OmniAuth provider without disabling import sources
Administrators are able to enable or disable Sign In by using some OmniAuth providers.
NOTE:
By default, Sign In is enabled by using all the OAuth Providers that have been configured in config/gitlab.yml.
To enable/disable an OmniAuth provider:
-
In the top navigation bar, go to Admin Area.
-
In the left sidebar, go to Settings.
-
Scroll to the Sign-in Restrictions section, and click Expand.
-
Next to Enabled OAuth Sign-In sources, select the check box for each provider you want to enable or disable.
Disabling OmniAuth
Starting from version 11.4 of GitLab, OmniAuth is enabled by default. This only has an effect if providers are configured and enabled.
If OmniAuth providers are causing problems even when individually disabled, you can disable the entire OmniAuth subsystem by modifying the configuration file:
For Omnibus installations
gitlab_rails['omniauth_enabled'] = false
For installations from source
omniauth:
  enabled: false
Keep OmniAuth user profiles up to date
You can enable profile syncing from selected OmniAuth providers and for all or for specific user information.
When authenticating using LDAP, the user's name and email are always synced.
gitlab_rails['omniauth_sync_profile_from_provider'] = ['twitter', 'google_oauth2']
gitlab_rails['omniauth_sync_profile_attributes'] = ['name', 'email', 'location']
For installations from source
omniauth:
  sync_profile_from_provider: ['twitter', 'google_oauth2']
  sync_profile_attributes: ['email', 'location']
Bypassing two factor authentication
In GitLab 12.3 or later, users can sign in with specified providers without using two factor authentication.
Define the allowed providers using an array (for example, ["twitter", 'google_oauth2']),
or as true or false to allow all providers (or none). This option should be
configured only for providers which already have two factor authentication
(default: false). This configuration doesn't apply to SAML.
gitlab_rails['omniauth_allow_bypass_two_factor'] = ['twitter', 'google_oauth2']
For installations from source
omniauth:
  allow_bypass_two_factor: ['twitter', 'google_oauth2']
Automatically sign in with provider
You can add the auto_sign_in_with_provider setting to your GitLab
configuration to redirect login requests to your OmniAuth provider for
authentication. This removes the need to click a button before actually signing in.
For example, when using the Azure integration, set the following to enable auto sign-in:
For Omnibus package:
gitlab_rails['omniauth_auto_sign_in_with_provider'] = 'azure_oauth2'
For installations from source:
omniauth:
  auto_sign_in_with_provider: azure_oauth2
Keep in mind that every sign-in attempt is redirected to the OmniAuth provider; you can't sign in using local credentials. Ensure at least one of the OmniAuth users has administrator permissions.
You may also bypass the auto sign in feature by browsing to
https://gitlab.example.com/users/sign_in?auto_sign_in=false.
Passwords for users created via OmniAuth
The Generated passwords for users created through integrated authentication guide provides an overview about how GitLab generates and sets passwords for users created with OmniAuth.