34 KiB
| type |
|---|
| howto |
Installing GitLab HA on Amazon Web Services (AWS)
DANGER: Danger: This guide is under review and the steps below will be revised and updated in due time. For more detail, please see this epic.
This page offers a walkthrough of a common HA (Highly Available) configuration for GitLab on AWS. You should customize it to accommodate your needs.
NOTE: Note For organizations with 300 users or less, the recommended AWS installation method is to launch an EC2 single box Omnibus Installation and implement a snapshot strategy for backing up the data.
Introduction
GitLab on AWS can leverage many of the services that are already configurable with GitLab High Availability (HA). These services offer a great deal of flexibility and can be adapted to the needs of most companies, while enabling the automation of both vertical and horizontal scaling.
In this guide, we'll go through a basic HA setup where we'll start by configuring our Virtual Private Cloud and subnets to later integrate services such as RDS for our database server and ElastiCache as a Redis cluster to finally manage them within an auto scaling group with custom scaling policies.
Requirements
In addition to having a basic familiarity with AWS and Amazon EC2, you will need:
- An AWS account
- To create or upload an SSH key to connect to the instance via SSH
- A domain name for the GitLab instance
- An SSL/TLS certificate to secure your domain. If you do not already own one, you can provision a free public SSL/TLS certificate through AWS Certificate Manager(ACM) for use with the Elastic Load Balancer we'll create.
NOTE: Note: It can take a few hours to validate a certificate provisioned through ACM. To avoid delays later, request your certificate as soon as possible.
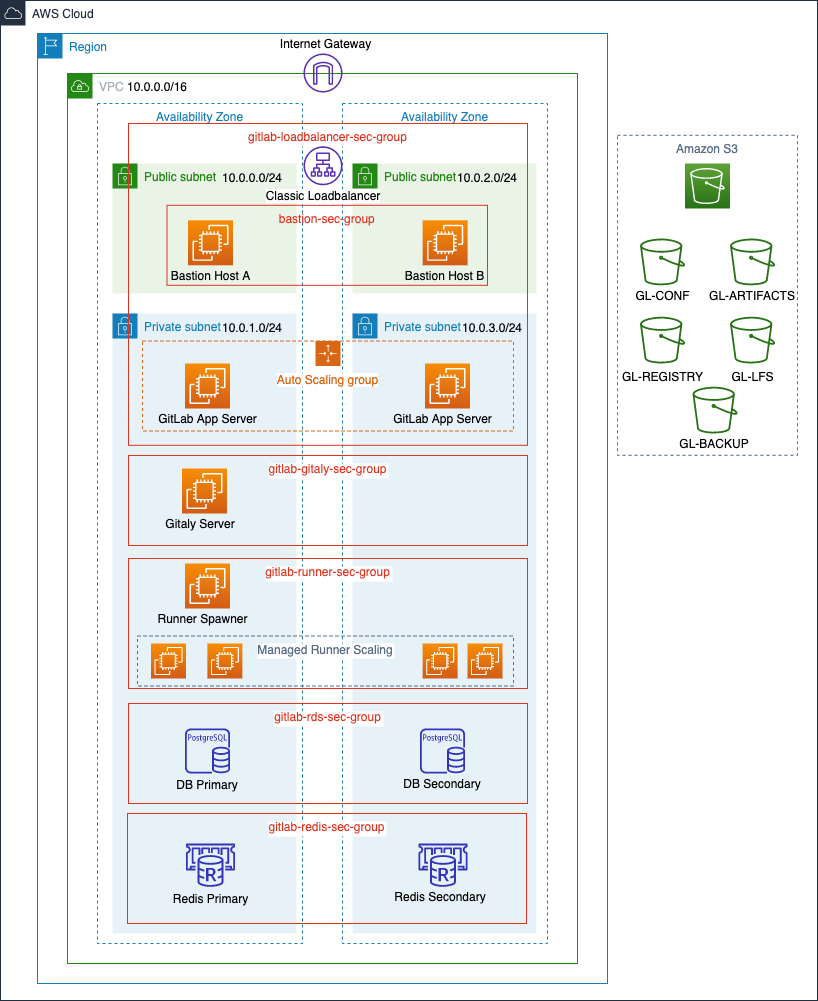
Architecture
Below is a diagram of the recommended architecture.
AWS costs
Here's a list of the AWS services we will use, with links to pricing information:
- EC2: GitLab will deployed on shared hardware which means on-demand pricing will apply. If you want to run it on a dedicated or reserved instance, consult the EC2 pricing page for more information on the cost.
- S3: We will use S3 to store backups, artifacts, LFS objects, etc. See the Amazon S3 pricing.
- ELB: A Classic Load Balancer will be used to route requests to the GitLab instances. See the Amazon ELB pricing.
- RDS: An Amazon Relational Database Service using PostgreSQL will be used to provide a High Availability database configuration. See the Amazon RDS pricing.
- ElastiCache: An in-memory cache environment will be used to provide a High Availability Redis configuration. See the Amazon ElastiCache pricing.
NOTE: Note: Please note that while we will be using EBS for storage, we do not recommend using EFS as it may negatively impact GitLab's performance. You can review the relevant documentation for more details.
Creating an IAM EC2 instance role and profile
To minimize the permissions of the user, we'll create a new IAM role with limited access:
- Navigate to the IAM dashboard https://console.aws.amazon.com/iam/home and click Create role.
- Create a new role by selecting AWS service > EC2, then click Next: Permissions.
- Choose AmazonEC2FullAccess and AmazonS3FullAccess, then click Next: Review.
- Give the role the name
GitLabAdminand click Create role.
Configuring the network
We'll start by creating a VPC for our GitLab cloud infrastructure, then we can create subnets to have public and private instances in at least two Availability Zones (AZs). Public subnets will require a Route Table keep and an associated Internet Gateway.
Creating the Virtual Private Cloud (VPC)
We'll now create a VPC, a virtual networking environment that you'll control:
-
Navigate to https://console.aws.amazon.com/vpc/home.
-
Select Your VPCs from the left menu and then click Create VPC. At the "Name tag" enter
gitlab-vpcand at the "IPv4 CIDR block" enter10.0.0.0/16. If you don't require dedicated hardware, you can leave "Tenancy" as default. Click Yes, Create when ready.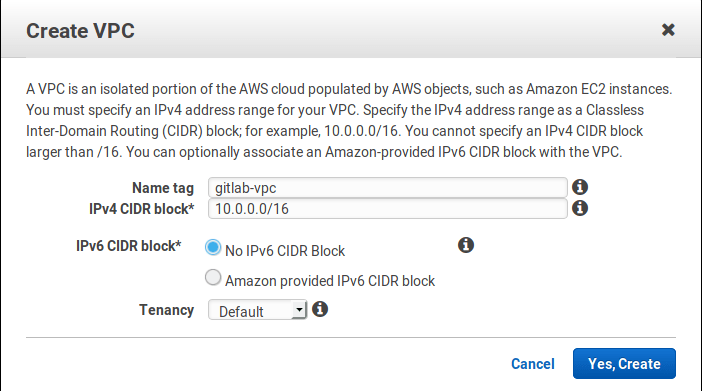
Subnets
Now, let's create some subnets in different Availability Zones. Make sure that each subnet is associated to the VPC we just created and that CIDR blocks don't overlap. This will also allow us to enable multi AZ for redundancy.
We will create private and public subnets to match load balancers and RDS instances as well:
-
Select Subnets from the left menu.
-
Click Create subnet. Give it a descriptive name tag based on the IP, for example
gitlab-public-10.0.0.0, select the VPC we created previously, and at the IPv4 CIDR block let's give it a 24 subnet10.0.0.0/24: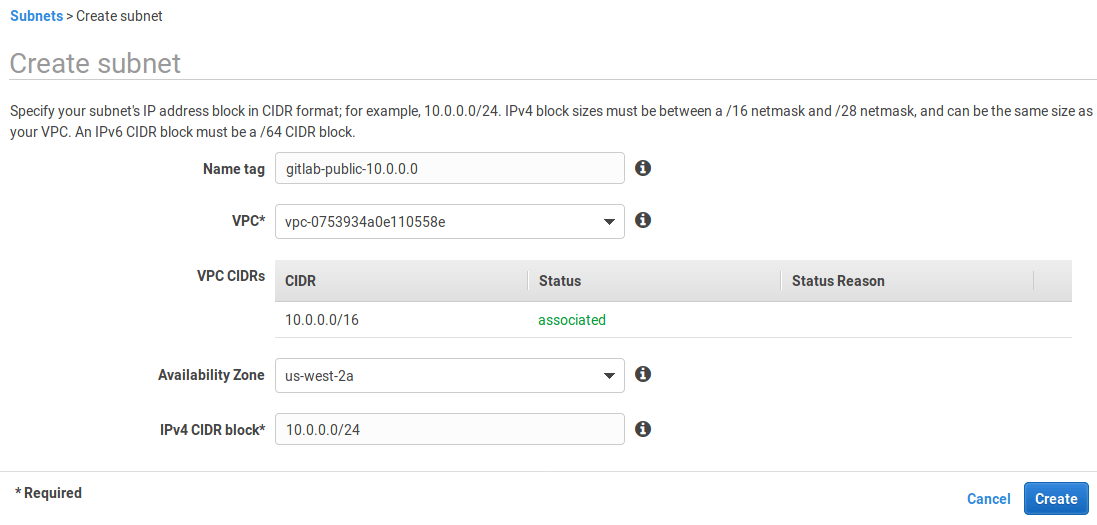
-
Follow the same steps to create all subnets:
Name tag Type Availability Zone CIDR block gitlab-public-10.0.0.0public us-west-2a10.0.0.0gitlab-private-10.0.1.0private us-west-2a10.0.1.0gitlab-public-10.0.2.0public us-west-2b10.0.2.0gitlab-private-10.0.3.0private us-west-2b10.0.3.0
Route Table
Up to now all our subnets are private. We need to create a Route Table to associate an Internet Gateway. On the same VPC dashboard:
- Select Route Tables from the left menu.
- Click Create Route Table.
- At the "Name tag" enter
gitlab-publicand choosegitlab-vpcunder "VPC". - Hit Yes, Create.
Internet Gateway
Now, still on the same dashboard, go to Internet Gateways and create a new one:
-
Select Internet Gateways from the left menu.
-
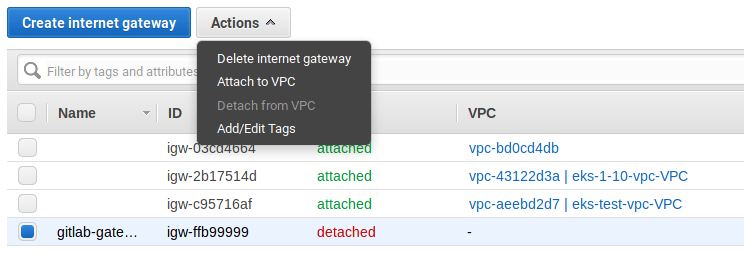
Click Create internet gateway, give it the name
gitlab-gatewayand click Create. -
Select it from the table, and then under the Actions dropdown choose "Attach to VPC".
-
Choose
gitlab-vpcfrom the list and hit Attach.
Configuring subnets
We now need to add a new target which will be our Internet Gateway and have it receive traffic from any destination.
-
Select Route Tables from the left menu and select the
gitlab-publicroute to show the options at the bottom. -
Select the Routes tab, hit Edit > Add another route and set
0.0.0.0/0as destination. In the target, select thegitlab-gatewaywe created previously. Hit Save once done.
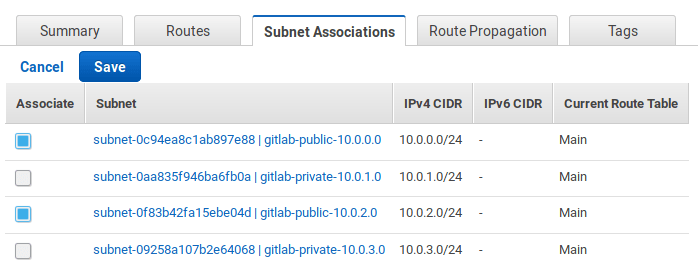
Next, we must associate the public subnets to the route table:
-
Select the Subnet Associations tab and hit Edit.
-
Check only the public subnet and hit Save.
Now that we're done with the network, let's create a security group.
Creating a security group
The security group is basically the firewall:
-
Select Security Groups from the left menu.
-
Click Create Security Group and fill in the details. Give it a name, add a description, and choose the VPC we created previously
-
Select the security group from the list and at the bottom select the Inbound Rules tab. You will need to open the SSH, HTTP, and HTTPS ports. Set the source to
0.0.0.0/0.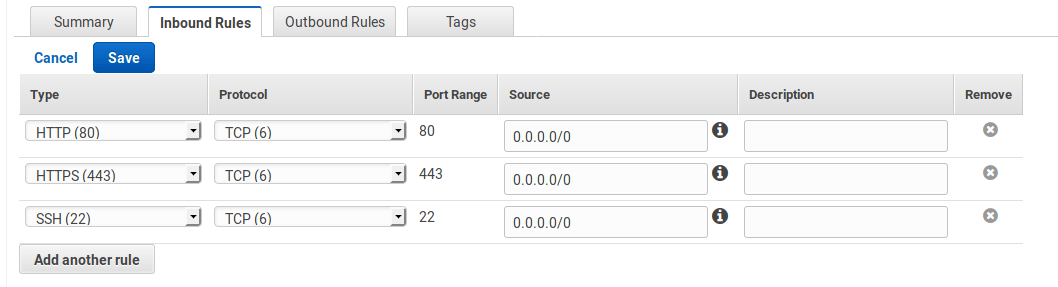
TIP: Tip: Based on best practices, you should allow SSH traffic from only a known host or CIDR block. In that case, change the SSH source to be custom and give it the IP you want to SSH from.
-
When done, click Save.
PostgreSQL with RDS
For our database server we will use Amazon RDS which offers Multi AZ for redundancy. Let's start by creating a subnet group and then we'll create the actual RDS instance.
RDS Subnet Group
-
Navigate to the RDS dashboard and select Subnet Groups from the left menu.
-
Click on Create DB Subnet Group.
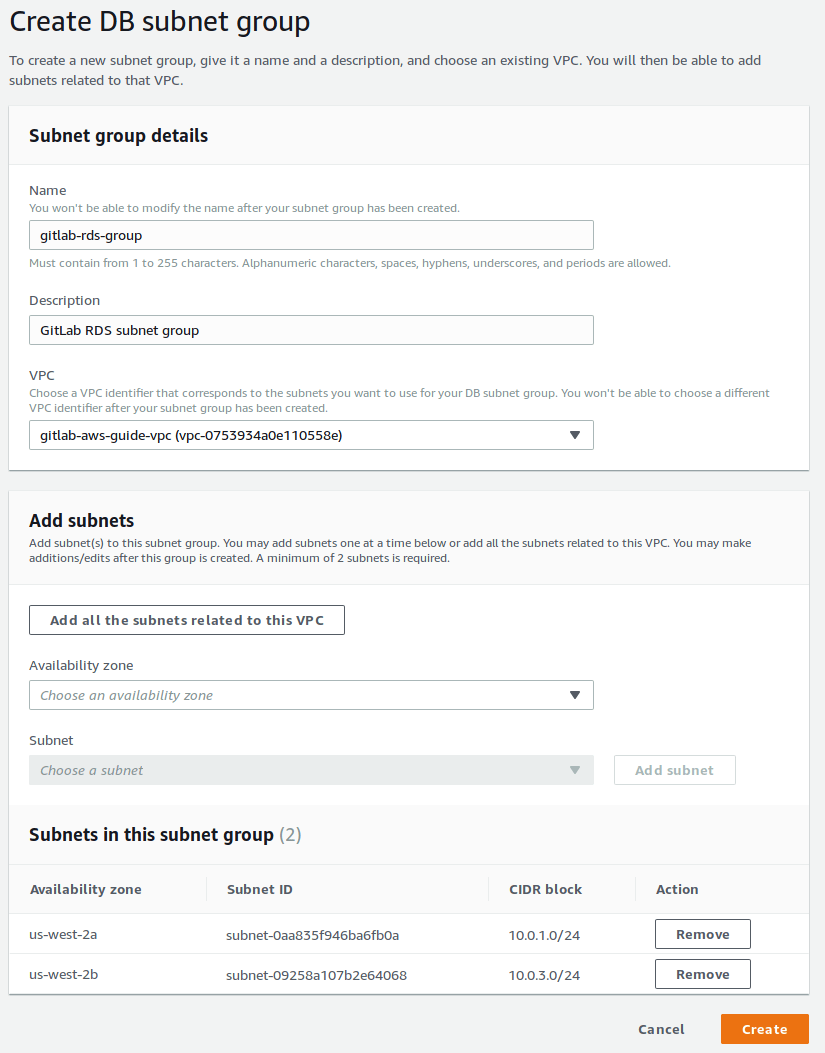
-
Under Subnet group details, enter a name (we'll use
gitlab-rds-group), a description, and choose thegitlab-vpcfrom the VPC dropdown. -
Under Add subnets, click Add all the subnets related to this VPC and remove the public ones, we only want the private subnets. In the end, you should see
10.0.1.0/24and10.0.3.0/24(as we defined them in the subnets section). -
Click Create when ready.
Creating the database
Now, it's time to create the database:
- Select Databases from the left menu and click Create database.
- Select Standard Create for the database creation method.
- Select PostgreSQL as the database engine and select PostgreSQL 10.9-R1 from the version dropdown menu (check the database requirements to see if there are any updates on this for your chosen version of GitLab).
- Since this is a production server, let's choose Production from the Templates section.
- Under Settings, set a DB instance identifier, a master username, and a master password. We'll use
gitlab-db-ha,gitlab, and a very secure password respectively. Make a note of these as we'll need them later. - For the DB instance size, select Standard classes and select an instance size that meets your requirements from the dropdown menu. We'll use a
db.m4.largeinstance. - Under Storage, configure the following:
- Select Provisioned IOPS (SSD) from the storage type dropdown menu. Provisioned IOPS (SSD) storage is best suited for HA (though you can choose General Purpose (SSD) to reduce the costs). Read more about it at Storage for Amazon RDS.
- Allocate storage and set provisioned IOPS. We'll use the minimum values,
100and1000, respectively. - Enable storage autoscaling (optional) and set a maximum storage threshold.
- Under Availability & durability, select Create a standby instance to have a standby RDS instance provisioned in a different Availability Zone. Read more at High Availability (Multi-AZ).
- Under Connectivity, configure the following:
- Select the VPC we created earlier (
gitlab-vpc) from the Virtual Private Cloud (VPC) dropdown menu. - Expand the Additional connectivity configuration section and select the subnet group (
gitlab-rds-group) we created earlier. - Set public accessibility to No.
- Under VPC security group, select Create new and enter a name. We'll use
gitlab-rds-sec-group. - Leave the database port as the default
5432.
- Select the VPC we created earlier (
- For Database authentication, select Password authentication.
- Expand the Additional configuration section and complete the following:
- The initial database name. We'll use
gitlabhq_production. - Configure your preferred backup settings.
- The only other change we'll make here is to disable auto minor version updates under Maintenance.
- Leave all the other settings as is or tweak according to your needs.
- Once you're happy, click Create database.
- The initial database name. We'll use
Now that the database is created, let's move on to setting up Redis with ElastiCache.
Redis with ElastiCache
ElastiCache is an in-memory hosted caching solution. Redis maintains its own persistence and is used for certain types of the GitLab application.
To set up Redis:
-
Navigate to the ElastiCache dashboard from your AWS console.
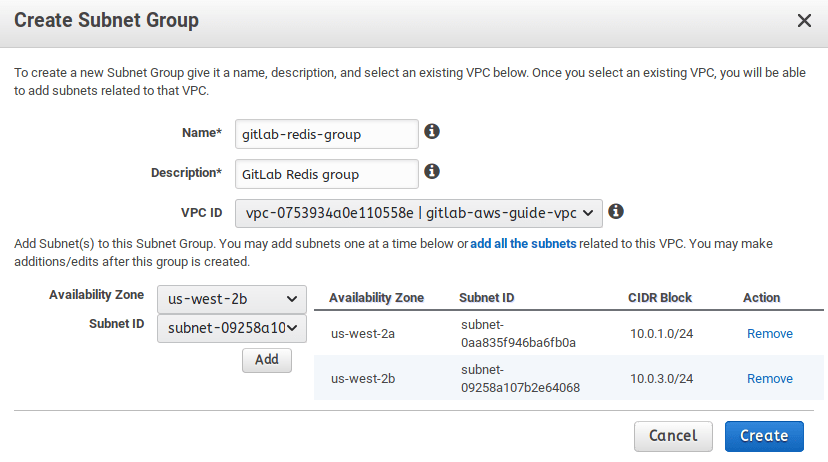
-
Go to Subnet Groups in the left menu, and create a new subnet group. Make sure to select our VPC and its private subnets. Click Create when ready.
-
Select Redis on the left menu and click Create to create a new Redis cluster. Depending on your load, you can choose whether to enable cluster mode or not. Even without cluster mode on, you still get the chance to deploy Redis in multi availability zones. In this guide, we chose not to enable it.
-
In the settings section:
- Give the cluster a name (
gitlab-redis) and a description. - For the version, select the latest of
3.2series (e.g.,3.2.10). - Select the node type and the number of replicas.
- Give the cluster a name (
-
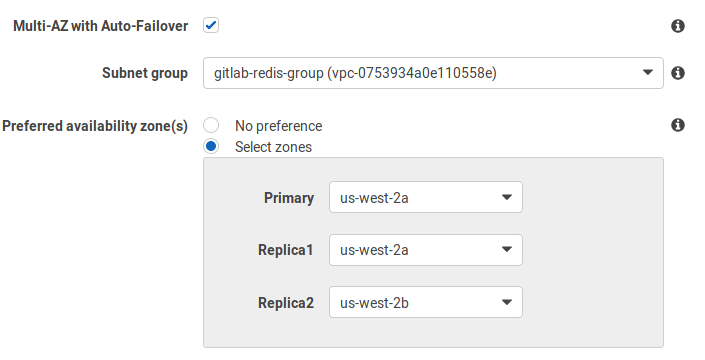
In the advanced settings section:
-
Select the multi-AZ auto-failover option.
-
Select the subnet group we created previously.
-
Manually select the preferred availability zones, and under "Replica 2" choose a different zone than the other two.
-
-
In the security settings, edit the security groups and choose the
gitlab-security-groupwe had previously created. -
Leave the rest of the settings to their default values or edit to your liking.
-
When done, click Create.
RDS and Redis Security Group
Let's navigate to our EC2 security groups and add a small change for our EC2
instances to be able to connect to RDS. First, copy the security group name we
defined, namely gitlab-security-group, select the RDS security group and edit the
inbound rules. Choose the rule type to be PostgreSQL and paste the name under
source.
Similar to the above, jump to the gitlab-security-group group
and add a custom TCP rule for port 6379 accessible within itself.
Load Balancer
On the EC2 dashboard, look for Load Balancer in the left navigation bar:
- Click the Create Load Balancer button.
- Choose the Classic Load Balancer.
- Give it a name (we'll use
gitlab-loadbalancer) and for the Create LB Inside option, selectgitlab-vpcfrom the dropdown menu. - In the Listeners section, set HTTP port 80, HTTPS port 443, and TCP port 22 for both load balancer and instance protocols and ports.
- In the Select Subnets section, select both public subnets from the list.
- Click Assign Security Groups and select Create a new security group, give it a name
(we'll use
gitlab-loadbalancer-sec-group) and description, and allow both HTTP and HTTPS traffic from anywhere (0.0.0.0/0, ::/0). - Click Configure Security Settings and select an SSL/TLS certificate from ACM or upload a certificate to IAM.
- Click Configure Health Check and set up a health check for your EC2 instances.
- For Ping Protocol, select HTTP.
- For Ping Port, enter 80.
- For Ping Path, enter
/explore. (We use/exploreas it's a public endpoint that does not require authorization.) - Keep the default Advanced Details or adjust them according to your needs.
- Click Add EC2 Instances but, as we don't have any instances to add yet, come back to your load balancer after creating your GitLab instances and add them.
- Click Add Tags and add any tags you need.
- Click Review and Create, review all your settings, and click Create if you're happy.
After the Load Balancer is up and running, you can revisit your Security Groups to refine the access only through the ELB and any other requirements you might have.
Configure DNS for Load Balancer
On the Route 53 dashboard, click Hosted zones in the left navigation bar:
- Select an existing hosted zone or, if you do not already have one for your domain, click Create Hosted Zone, enter your domain name, and click Create.
- Click Create Record Set and provide the following values:
- Name: Use the domain name (the default value) or enter a subdomain.
- Type: Select A - IPv4 address.
- Alias Target: Find the ELB Classic Load Balancers section and select the classic load balancer we created earlier.
- Routing Policy: We'll use Simple but you can choose a different policy based on your use case.
- Evaluate Target Health: We'll set this to No but you can choose to have the load balancer route traffic based on target health.
- Click Create.
- Update your DNS records with your domain registrar. The steps for doing this vary depending on which registrar you use and is beyond the scope of this guide.
Setting up Bastion Hosts
Since our GitLab instances will be in private subnets, we need a way to connect to these instances via SSH to make configuration changes, perform upgrades, etc. One way of doing this is via a bastion host, sometimes also referred to as a jump box.
TIP: Tip: If you do not want to maintain bastion hosts, you can set up AWS Systems Manager Session Manager for access to instances. This is beyond the scope of this document.
Create Bastion Host A
- Navigate to the EC2 Dashboard and click on Launch instance.
- Select the Ubuntu Server 18.04 LTS (HVM) AMI.
- Choose an instance type. We'll use a
t2.microas we'll only use the bastion host to SSH into our other instances. - Click Configure Instance Details.
- Under Network, select the
gitlab-vpcfrom the dropdown menu. - Under Subnet, select the public subnet we created earlier (
gitlab-public-10.0.0.0). - Double check that under Auto-assign Public IP you have Use subnet setting (Enable) selected.
- Leave everything else as default and click Add Storage.
- Under Network, select the
- For storage, we'll leave everything as default and only add an 8GB root volume. We won't store anything on this instance.
- Click Add Tags and on the next screen click Add Tag.
- We’ll only set
Key: NameandValue: Bastion Host A.
- We’ll only set
- Click Configure Security Group.
- Select Create a new security group, enter a Security group name (we'll use
bastion-sec-group), and add a description. - We'll enable SSH access from anywhere (
0.0.0.0/0). If you want stricter security, specify a single IP address or an IP address range in CIDR notation. - Click Review and Launch
- Select Create a new security group, enter a Security group name (we'll use
- Review all your settings and, if you're happy, click Launch.
- Acknowledge that you have access to an existing key pair or create a new one. Click Launch Instance.
Confirm that you can SSH into the instance:
- On the EC2 Dashboard, click on Instances in the left menu.
- Select Bastion Host A from your list of instances.
- Click Connect and follow the connection instructions.
- If you are able to connect successfully, let's move on to setting up our second bastion host for redundancy.
Create Bastion Host B
- Create an EC2 instance following the same steps as above with the following changes:
- For the Subnet, select the second public subnet we created earlier (
gitlab-public-10.0.2.0). - Under the Add Tags section, we’ll set
Key: NameandValue: Bastion Host Bso that we can easily identify our two instances. - For the security group, select the existing
bastion-sec-groupwe created above.
- For the Subnet, select the second public subnet we created earlier (
Use SSH Agent Forwarding
EC2 instances running Linux use private key files for SSH authentication. You'll connect to your bastion host using an SSH client and the private key file stored on your client. Since the private key file is not present on the bastion host, you will not be able to connect to your instances in private subnets.
Storing private key files on your bastion host is a bad idea. To get around this, use SSH agent forwarding on your client. See Securely Connect to Linux Instances Running in a Private Amazon VPC for a step-by-step guide on how to use SSH agent forwarding.
Deploying GitLab inside an auto scaling group
We'll use AWS's wizard to deploy GitLab and then SSH into the instance to configure the PostgreSQL and Redis connections.
The Auto Scaling Group option is available through the EC2 dashboard on the left sidebar.
- Click Create Auto Scaling group.
- Create a new launch configuration.
Choose the AMI
Choose the AMI:
-
Go to the Community AMIs and search for
GitLab EE <version>where<version>the latest version as seen on the releases page.
Choose an instance type
You should choose an instance type based on your workload. Consult
the hardware requirements to choose
one that fits your needs (at least c5.xlarge, which is enough to accommodate 100 users):
- Choose the your instance type.
- Click Next: Configure Instance Details.
Configure details
In this step we'll configure some details:
- Enter a name (
gitlab-autoscaling). - Select the IAM role we created.
- Optionally, enable CloudWatch and the EBS-optimized instance settings.
- In the "Advanced Details" section, set the IP address type to "Do not assign a public IP address to any instances."
- Click Next: Add Storage.
Add storage
The root volume is 8GB by default and should be enough given that we won't store any data there.
Configure security group
As a last step, configure the security group:
- Select the existing load balancer security group we have created.
- Select Review.
Review and launch
Now is a good time to review all the previous settings. When ready, click Create launch configuration and select the SSH key pair with which you will connect to the instance.
Create Auto Scaling Group
We are now able to start creating our Auto Scaling Group:
- Give it a group name.
- Set the group size to 2 as we want to always start with two instances.
- Assign it our network VPC and add the private subnets.
- In the "Advanced Details" section, choose to receive traffic from ELBs and select our ELB.
- Choose the ELB health check.
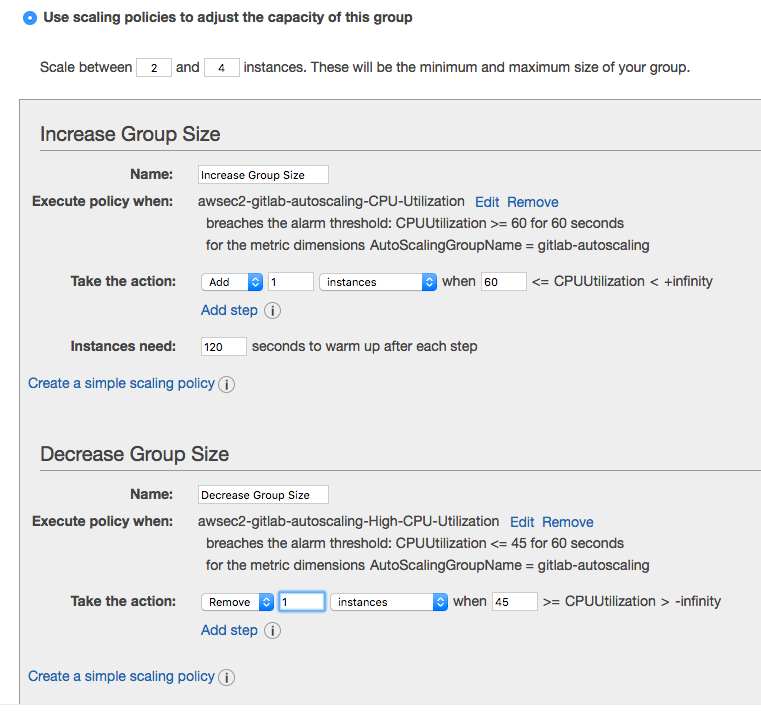
- Click Next: Configure scaling policies.
This is the really great part of Auto Scaling; we get to choose when AWS launches new instances and when it removes them. For this group we'll scale between 2 and 4 instances where one instance will be added if CPU utilization is greater than 60% and one instance is removed if it falls to less than 45%.
Finally, configure notifications and tags as you see fit, and create the auto scaling group.
You'll notice that after we save the configuration, AWS starts launching our two instances in different AZs and without a public IP which is exactly what we intended.
After deployment
After a few minutes, the instances should be up and accessible via the internet. Let's connect to the primary and configure some things before logging in.
Installing the pg_trgm extension for PostgreSQL
Connect to the RDS instance to verify access and to install the required pg_trgm extension.
To find the host or endpoint, naviagate to Amazon RDS > Databases and click on the database you created earlier. Look for the endpoint under the Connectivity & security tab.
Do not to include the colon and port number:
sudo /opt/gitlab/embedded/bin/psql -U gitlab -h <rds-endpoint> -d gitlabhq_production
At the psql prompt create the extension and then quit the session:
psql (10.9)
Type "help" for help.

gitlab=# CREATE EXTENSION pg_trgm;
gitlab=# \q
Configuring GitLab to connect with postgres and Redis
Edit the gitlab.rb file at /etc/gitlab/gitlab.rb
find the external_url 'http://gitlab.example.com' option and change it
to the domain you will be using or the public IP address of the current
instance to test the configuration.
For a more detailed description about configuring GitLab, see Configuring GitLab for HA
Now look for the GitLab database settings and uncomment as necessary. In our current case we'll specify the database adapter, encoding, host, name, username, and password:
# Disable the built-in Postgres
postgresql['enable'] = false

# Fill in the connection details
gitlab_rails['db_adapter'] = "postgresql"
gitlab_rails['db_encoding'] = "unicode"
gitlab_rails['db_database'] = "gitlabhq_production"
gitlab_rails['db_username'] = "gitlab"
gitlab_rails['db_password'] = "mypassword"
gitlab_rails['db_host'] = "<rds-endpoint>"
Next, we need to configure the Redis section by adding the host and uncommenting the port:
# Disable the built-in Redis
redis['enable'] = false

# Fill in the connection details
gitlab_rails['redis_host'] = "<redis-endpoint>"
gitlab_rails['redis_port'] = 6379
Finally, reconfigure GitLab for the change to take effect:
sudo gitlab-ctl reconfigure
You might also find it useful to run a check and a service status to make sure everything has been setup correctly:
sudo gitlab-rake gitlab:check
sudo gitlab-ctl status
If everything looks good, you should be able to reach GitLab in your browser.
Setting up Gitaly
CAUTION: Caution: In this architecture, having a single Gitaly server creates a single point of failure. This limitation will be removed once Gitaly HA is released.
Gitaly is a service that provides high-level RPC access to Git repositories. It should be enabled and configured on a separate EC2 instance in one of the private subnets we configured previously.
Let's create an EC2 instance where we'll install Gitaly:
- From the EC2 dashboard, click Launch instance.
- Choose an AMI. In this example, we'll select the Ubuntu Server 18.04 LTS (HVM), SSD Volume Type.
- Choose an instance type. We'll pick a c5.xlarge.
- Click Configure Instance Details.
- In the Network dropdown, select
gitlab-vpc, the VPC we created earlier. - In the Subnet dropdown, select
gitlab-private-10.0.1.0from the list of subnets we created earlier. - Double check that Auto-assign Public IP is set to
Use subnet setting (Disable). - Click Add Storage.
- In the Network dropdown, select
- Increase the Root volume size to
20 GiBand change the Volume Type toProvisoned IOPS SSD (io1). (This is an arbitrary size. Create a volume big enough for your repository storage requirements.)- For IOPS set
1000(20 GiB x 50 IOPS). You can provision up to 50 IOPS per GiB. If you select a larger volume, increase the IOPS accordingly. Workloads where many small files are written in a serialized manner, likegit, requires performant storage, hence the choice ofProvisoned IOPS SSD (io1).
- For IOPS set
- Click on Add Tags and add your tags. In our case, we'll only set
Key: NameandValue: Gitaly. - Click on Configure Security Group and let's Create a new security group.
- Give your security group a name and description. We'll use
gitlab-gitaly-sec-groupfor both. - Create a Custom TCP rule and add port
8075to the Port Range. For the Source, select thegitlab-loadbalancer-sec-group.
- Give your security group a name and description. We'll use
- Click Review and launch followed by Launch if you're happy with your settings.
- Finally, acknowledge that you have access to the selected private key file or create a new one. Click Launch Instances.
Optional: Instead of storing configuration and repository data on the root volume, you can also choose to add an additional EBS volume for repository storage. Follow the same guidance as above. See the Amazon EBS pricing.
Now that we have our EC2 instance ready, follow the documentation to install GitLab and set up Gitaly on its own server.
Using Amazon S3 object storage
GitLab stores many objects outside the Git repository, many of which can be uploaded to S3. That way, you can offload the root disk volume of these objects which would otherwise take much space.
In particular, you can store in S3:
- The Git LFS objects ((Omnibus GitLab installations))
- The Container Registry images (Omnibus GitLab installations)
- The GitLab CI/CD job artifacts (Omnibus GitLab installations)
Setting up a domain name
After you SSH into the instance, configure the domain name:
-
Open
/etc/gitlab/gitlab.rbwith your preferred editor. -
Edit the
external_urlvalue:external_url 'http://example.com' -
Reconfigure GitLab:
sudo gitlab-ctl reconfigure
You should now be able to reach GitLab at the URL you defined. To use HTTPS (recommended), see the HTTPS documentation.
Logging in for the first time
If you followed the previous section, you should be now able to visit GitLab
in your browser. The very first time, you will be asked to set up a password
for the root user which has admin privileges on the GitLab instance.
After you set it up, login with username root and the newly created password.
Health check and monitoring with Prometheus
Apart from Amazon's Cloudwatch which you can enable on various services, GitLab provides its own integrated monitoring solution based on Prometheus. For more information on how to set it up, visit the GitLab Prometheus documentation
GitLab also has various health check endpoints that you can ping and get reports.
GitLab Runners
If you want to take advantage of GitLab CI/CD, you have to set up at least one GitLab Runner.
Read more on configuring an autoscaling GitLab Runner on AWS.
Backup and restore
GitLab provides a tool to backup and restore its Git data, database, attachments, LFS objects, etc.
Some important things to know:
- The backup/restore tool does not store some configuration files, like secrets; you'll need to configure this yourself.
- By default, the backup files are stored locally, but you can backup GitLab using S3.
- You can exclude specific directories form the backup.
Backing up GitLab
To back up GitLab:
-
SSH into your instance.
-
Take a backup:
sudo gitlab-backup create
NOTE: Note
For GitLab 12.1 and earlier, use gitlab-rake gitlab:backup:create.
Restoring GitLab from a backup
To restore GitLab, first review the restore documentation, and primarily the restore prerequisites. Then, follow the steps under the Omnibus installations section.
Updating GitLab
GitLab releases a new version every month on the 22nd. Whenever a new version is released, you can update your GitLab instance:
-
SSH into your instance
-
Take a backup:
sudo gitlab-backup create
NOTE: Note
For GitLab 12.1 and earlier, use gitlab-rake gitlab:backup:create.
-
Update the repositories and install GitLab:
sudo apt update
sudo apt install gitlab-ee
After a few minutes, the new version should be up and running.
Conclusion
In this guide, we went mostly through scaling and some redundancy options, your mileage may vary.
Keep in mind that all Highly Available solutions come with a trade-off between cost/complexity and uptime. The more uptime you want, the more complex the solution. And the more complex the solution, the more work is involved in setting up and maintaining it.
Have a read through these other resources and feel free to open an issue to request additional material:
- GitLab High Availability: GitLab supports several different types of clustering and high-availability.
- Geo replication: Geo is the solution for widely distributed development teams.
- Omnibus GitLab - Everything you need to know about administering your GitLab instance.
- Upload a license: Activate all GitLab Enterprise Edition functionality with a license.
- Pricing: Pricing for the different tiers.