26 KiB
Gitaly
Gitaly is the service that provides high-level RPC access to Git repositories. Without it, no other components can read or write Git data. GitLab components that access Git repositories (gitlab-rails, gitlab-shell, gitlab-workhorse, etc.) act as clients to Gitaly. End users do not have direct access to Gitaly.
In the rest of this page, Gitaly server is referred to the standalone node that only runs Gitaly, and Gitaly client to the GitLab Rails node that runs all other processes except Gitaly.
Architecture
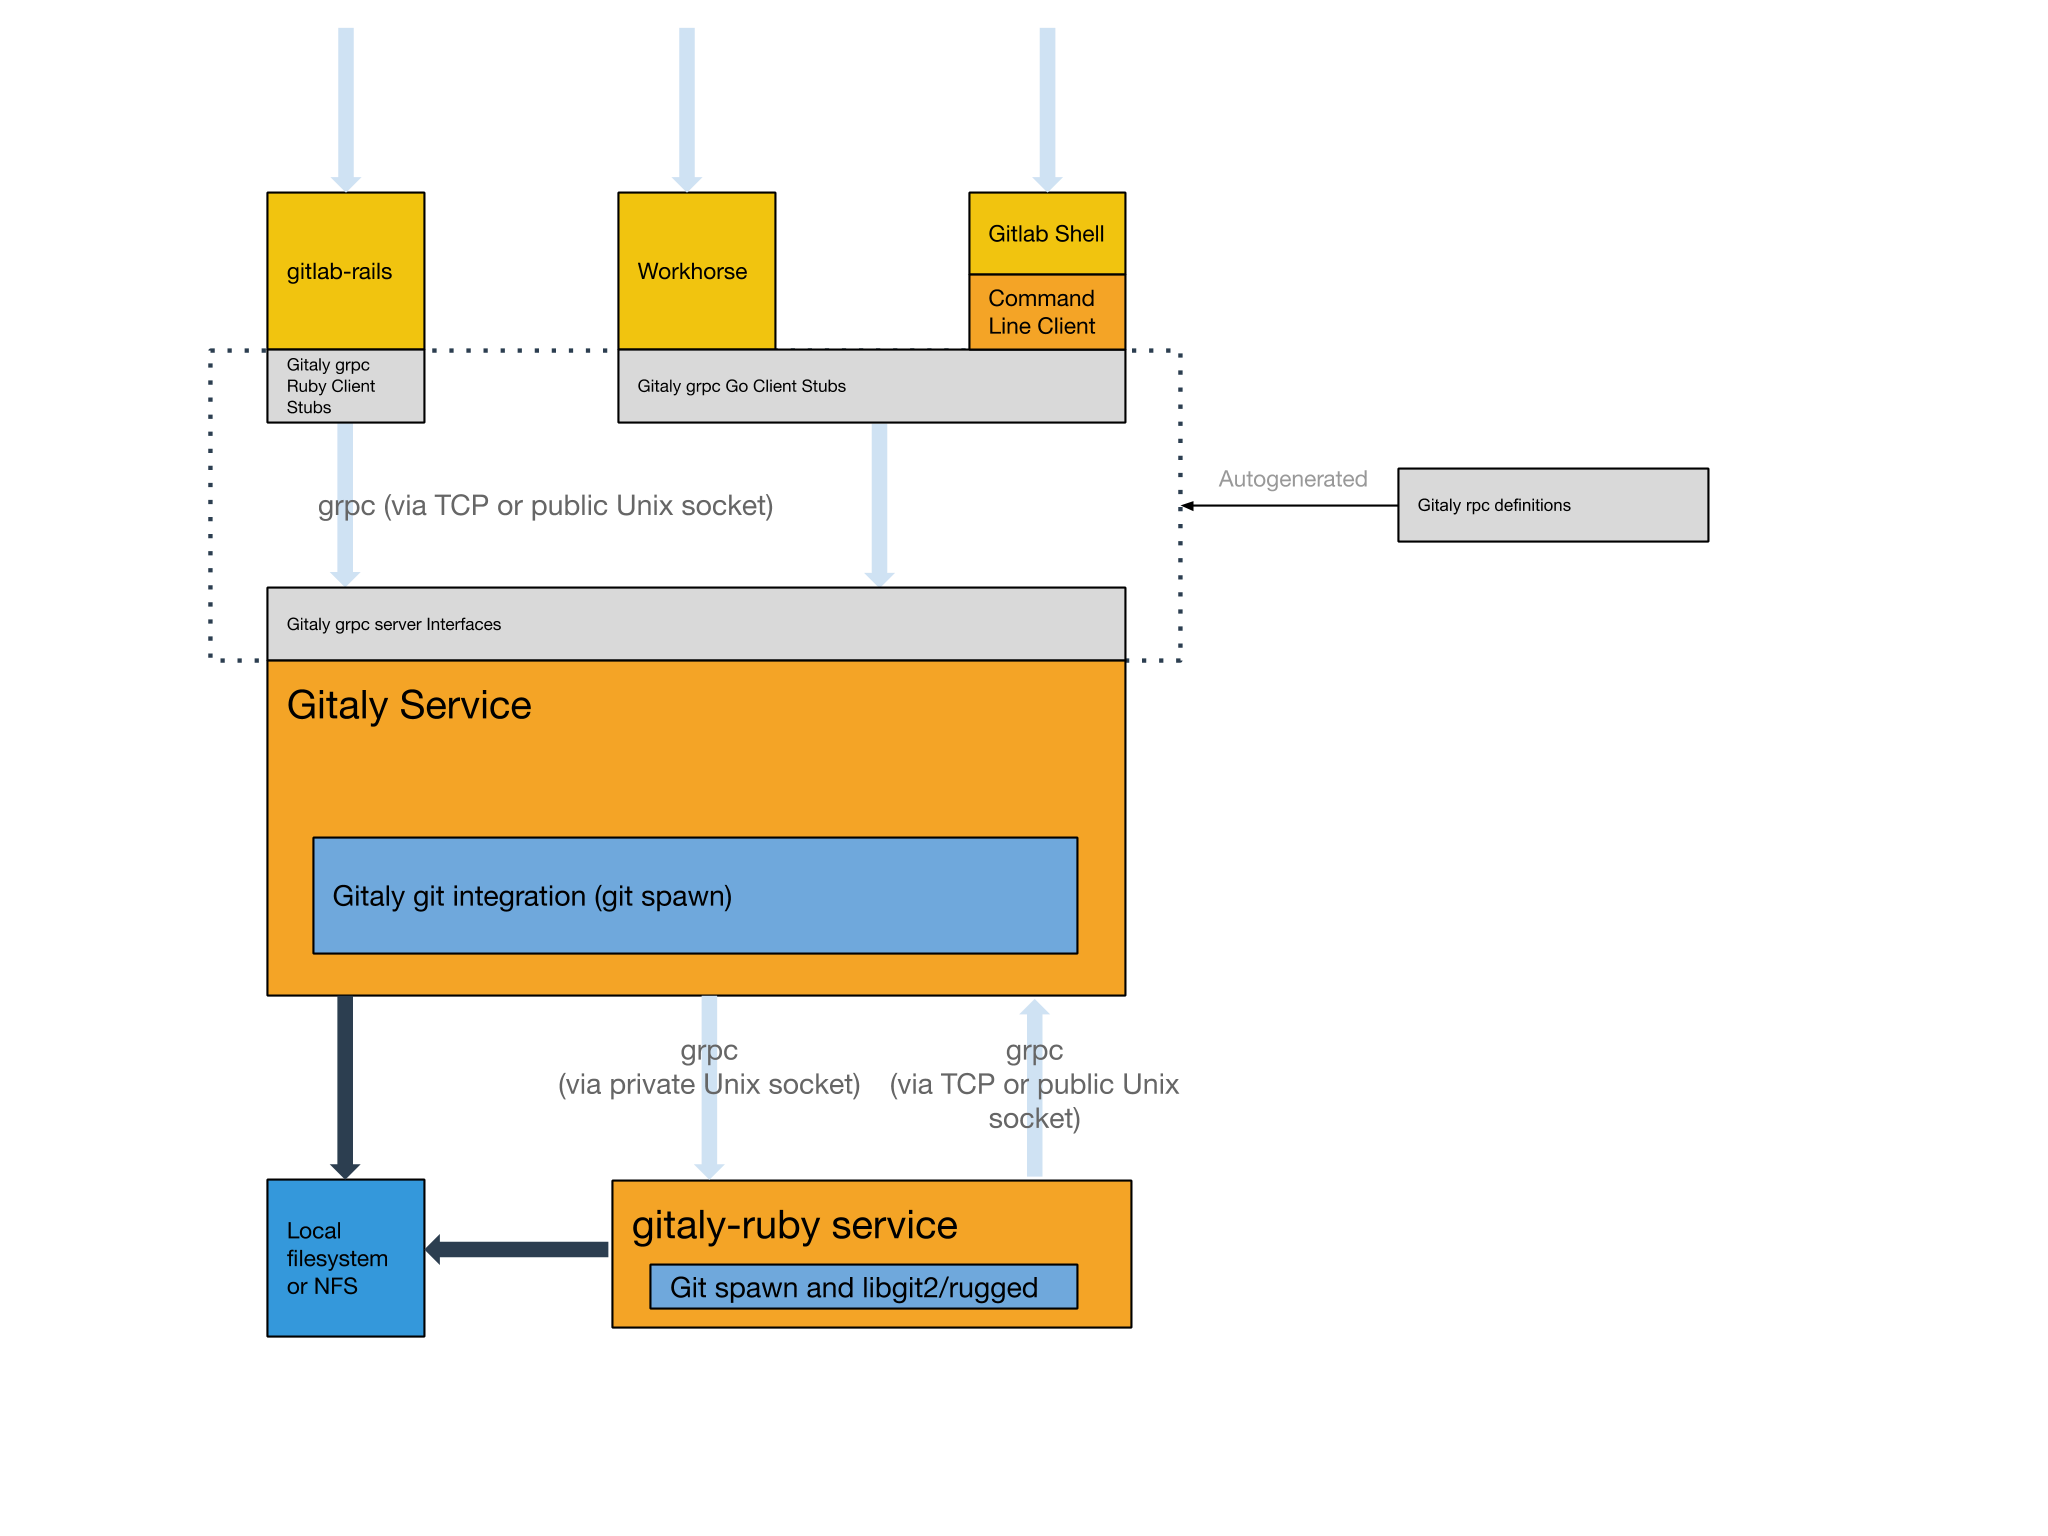
Here's a high-level architecture overview of how Gitaly is used.
Configuring Gitaly
The Gitaly service itself is configured via a TOML configuration file.
In case you want to change some of its settings:
For Omnibus GitLab
- Edit
/etc/gitlab/gitlab.rband add or change the Gitaly settings. - Save the file and reconfigure GitLab.
For installations from source
- Edit
/home/git/gitaly/config.tomland add or change the Gitaly settings. - Save the file and restart GitLab.
Running Gitaly on its own server
This is an optional way to deploy Gitaly which can benefit GitLab installations that are larger than a single machine. Most installations will be better served with the default configuration used by Omnibus and the GitLab source installation guide.
Starting with GitLab 11.4, Gitaly is able to serve all Git requests without requiring a shared NFS mount for Git repository data. Between 11.4 and 11.8 the exception was the Elasticsearch indexer. But since 11.8 the indexer uses Gitaly for data access as well. NFS can still be leveraged for redudancy on block level of the Git data. But only has to be mounted on the Gitaly server.
Starting with GitLab 11.8, it is possible to use ElasticSearch in conjunction with a Gitaly setup that isn't utilising NFS. In order to use ElasticSearch in this scenario, the new repository indexer needs to be enabled in your GitLab configuration.
NOTE: Note: While Gitaly can be used as a replacement for NFS, it's not recommended to use EFS as it may impact GitLab's performance. Review the relevant documentation for more details.
Network architecture
The following list depicts what the network architecture of Gitaly is:
- GitLab Rails shards repositories into repository storages.
/config/gitlab.ymlcontains a map from storage names to(Gitaly address, Gitaly token)pairs.- the
storage name->(Gitaly address, Gitaly token)map in/config/gitlab.ymlis the single source of truth for the Gitaly network topology. - A
(Gitaly address, Gitaly token)corresponds to a Gitaly server. - A Gitaly server hosts one or more storages.
- A GitLab server can use one or more Gitaly servers.
- Gitaly addresses must be specified in such a way that they resolve correctly for ALL Gitaly clients.
- Gitaly clients are: Unicorn, Sidekiq, gitlab-workhorse, gitlab-shell, Elasticsearch Indexer, and Gitaly itself.
- A Gitaly server must be able to make RPC calls to itself via its own
(Gitaly address, Gitaly token)pair as specified in/config/gitlab.yml. - Gitaly servers must not be exposed to the public internet as Gitaly's network traffic is unencrypted by default. The use of firewall is highly recommended to restrict access to the Gitaly server. Another option is to use TLS.
- Authentication is done through a static token which is shared among the Gitaly and GitLab Rails nodes.
Below we describe how to configure two Gitaly servers one at
gitaly1.internal and the other at gitaly2.internal
with secret token abc123secret. We assume
your GitLab installation has three repository storages: default,
storage1 and storage2.
1. Installation
First install Gitaly on each Gitaly server using either Omnibus GitLab or install it from source:
- For Omnibus GitLab: Download/install the Omnibus GitLab
package you want using steps 1 and 2 from the GitLab downloads page but
do not provide the
EXTERNAL_URL=value. - From source: Install Gitaly.
2. Client side token configuration
Configure a token on the instance that runs the GitLab Rails application.
For Omnibus GitLab
-
On the client node(s), edit
/etc/gitlab/gitlab.rb:gitlab_rails['gitaly_token'] = 'abc123secret' -
Save the file and reconfigure GitLab.
For installations from source
-
On the client node(s), edit
/home/git/gitlab/config/gitlab.yml:gitlab: gitaly: token: 'abc123secret' -
Save the file and restart GitLab.
3. Gitaly server configuration
Next, on the Gitaly servers, you need to configure storage paths, enable the network listener and configure the token.
NOTE: Note: if you want to reduce the risk of downtime when you enable authentication you can temporarily disable enforcement, see the documentation on configuring Gitaly authentication .
Gitaly must trigger some callbacks to GitLab via GitLab Shell. As a result,
the GitLab Shell secret must be the same between the other GitLab servers and
the Gitaly server. The easiest way to accomplish this is to copy /etc/gitlab/gitlab-secrets.json
from an existing GitLab server to the Gitaly server. Without this shared secret,
Git operations in GitLab will result in an API error.
NOTE: Note:
In most or all cases, the storage paths below end in /repositories which is
not the case with path in git_data_dirs of Omnibus GitLab installations.
Check the directory layout on your Gitaly server to be sure.
For Omnibus GitLab
-
Edit
/etc/gitlab/gitlab.rb:# /etc/gitlab/gitlab.rb # Avoid running unnecessary services on the Gitaly server postgresql['enable'] = false redis['enable'] = false nginx['enable'] = false prometheus['enable'] = false unicorn['enable'] = false sidekiq['enable'] = false gitlab_workhorse['enable'] = false # Prevent database connections during 'gitlab-ctl reconfigure' gitlab_rails['rake_cache_clear'] = false gitlab_rails['auto_migrate'] = false # Configure the gitlab-shell API callback URL. Without this, `git push` will # fail. This can be your 'front door' GitLab URL or an internal load # balancer. # Don't forget to copy `/etc/gitlab/gitlab-secrets.json` from web server to Gitaly server. gitlab_rails['internal_api_url'] = 'https://gitlab.example.com' # Make Gitaly accept connections on all network interfaces. You must use # firewalls to restrict access to this address/port. gitaly['listen_addr'] = "0.0.0.0:8075" gitaly['auth_token'] = 'abc123secret' # To use TLS for Gitaly you need to add gitaly['tls_listen_addr'] = "0.0.0.0:9999" gitaly['certificate_path'] = "path/to/cert.pem" gitaly['key_path'] = "path/to/key.pem" -
Append the following to
/etc/gitlab/gitlab.rbfor each respective server:For
gitaly1.internal:gitaly['storage'] = [ { 'name' => 'default' }, { 'name' => 'storage1' }, ]For
gitaly2.internal:gitaly['storage'] = [ { 'name' => 'storage2' }, ]NOTE: Note: In some cases, you'll have to set
pathforgitaly['storage']in the format'path' => '/mnt/gitlab/<storage name>/repositories'. -
Save the file and reconfigure GitLab.
For installations from source
-
On the client node(s), edit
/home/git/gitaly/config.toml:listen_addr = '0.0.0.0:8075' tls_listen_addr = '0.0.0.0:9999' [tls] certificate_path = /path/to/cert.pem key_path = /path/to/key.pem [auth] token = 'abc123secret' -
Append the following to
/home/git/gitaly/config.tomlfor each respective server:For
gitaly1.internal:[[storage]] name = 'default' [[storage]] name = 'storage1'For
gitaly2.internal:[[storage]] name = 'storage2'NOTE: Note: In some cases, you'll have to set
pathfor each[[storage]]in the formatpath = '/mnt/gitlab/<storage name>/repositories'. -
Save the file and restart GitLab.
4. Converting clients to use the Gitaly server
As the final step, you need to update the client machines to switch from using their local Gitaly service to the new Gitaly server you just configured. This is a risky step because if there is any sort of network, firewall, or name resolution problem preventing your GitLab server from reaching the Gitaly server, then all Gitaly requests will fail.
Additionally, you need to disable Rugged if previously manually enabled.
We assume that your gitaly1.internal Gitaly server can be reached at
gitaly1.internal:8075 from your GitLab server, and that Gitaly server
can read and write to /mnt/gitlab/default and /mnt/gitlab/storage1.
We assume also that your gitaly2.internal Gitaly server can be reached at
gitaly2.internal:8075 from your GitLab server, and that Gitaly server
can read and write to /mnt/gitlab/storage2.
For Omnibus GitLab
-
Edit
/etc/gitlab/gitlab.rb:git_data_dirs({ 'default' => { 'gitaly_address' => 'tcp://gitaly1.internal:8075' }, 'storage1' => { 'gitaly_address' => 'tcp://gitaly1.internal:8075' }, 'storage2' => { 'gitaly_address' => 'tcp://gitaly2.internal:8075' }, }) gitlab_rails['gitaly_token'] = 'abc123secret' -
Save the file and reconfigure GitLab.
-
Tail the logs to see the requests:
sudo gitlab-ctl tail gitaly
For installations from source
-
Edit
/home/git/gitlab/config/gitlab.yml:gitlab: repositories: storages: default: gitaly_address: tcp://gitaly1.internal:8075 path: /some/dummy/path storage1: gitaly_address: tcp://gitaly1.internal:8075 path: /some/dummy/path storage2: gitaly_address: tcp://gitaly2.internal:8075 path: /some/dummy/path gitaly: token: 'abc123secret'NOTE: Note:
/some/dummy/pathshould be set to a local folder that exists, however no data will be stored in this folder. This will no longer be necessary after this issue is resolved. -
Save the file and restart GitLab.
-
Tail the logs to see the requests:
tail -f /home/git/gitlab/log/gitaly.log
When you tail the Gitaly logs on your Gitaly server you should see requests coming in. One sure way to trigger a Gitaly request is to clone a repository from your GitLab server over HTTP.
Disabling the Gitaly service in a cluster environment
If you are running Gitaly as a remote service you may want to disable the local Gitaly service that runs on your GitLab server by default. Disabling Gitaly only makes sense when you run GitLab in a custom cluster configuration, where different services run on different machines. Disabling Gitaly on all machines in the cluster is not a valid configuration.
To disable Gitaly on a client node:
For Omnibus GitLab
-
Edit
/etc/gitlab/gitlab.rb:gitaly['enable'] = false -
Save the file and reconfigure GitLab.
For installations from source
-
Edit
/etc/default/gitlab:gitaly_enabled=false -
Save the file and restart GitLab.
TLS support
Introduced in GitLab 11.8.
Gitaly supports TLS encryption. To be able to communicate
with a Gitaly instance that listens for secure connections you will need to use tls:// url
scheme in the gitaly_address of the corresponding storage entry in the GitLab configuration.
You will need to bring your own certificates as this isn't provided automatically. The certificate to be used needs to be installed on all Gitaly nodes and on all client nodes that communicate with it following the procedure described in GitLab custom certificate configuration.
NOTE: Note:
It is possible to configure Gitaly servers with both an
unencrypted listening address listen_addr and an encrypted listening
address tls_listen_addr at the same time. This allows you to do a
gradual transition from unencrypted to encrypted traffic, if necessary.
To configure Gitaly with TLS:
For Omnibus GitLab
-
On the client nodes, edit
/etc/gitlab/gitlab.rb:git_data_dirs({ 'default' => { 'gitaly_address' => 'tls://gitaly1.internal:9999' }, 'storage1' => { 'gitaly_address' => 'tls://gitaly1.internal:9999' }, 'storage2' => { 'gitaly_address' => 'tls://gitaly2.internal:9999' }, }) gitlab_rails['gitaly_token'] = 'abc123secret' -
Save the file and reconfigure GitLab.
-
On the Gitaly server nodes, edit
/etc/gitlab/gitlab.rb:gitaly['tls_listen_addr'] = "0.0.0.0:9999" gitaly['certificate_path'] = "path/to/cert.pem" gitaly['key_path'] = "path/to/key.pem" -
Save the file and reconfigure GitLab.
For installations from source
-
On the client nodes, edit
/home/git/gitlab/config/gitlab.yml:gitlab: repositories: storages: default: gitaly_address: tls://gitaly1.internal:9999 path: /some/dummy/path storage1: gitaly_address: tls://gitaly1.internal:9999 path: /some/dummy/path storage2: gitaly_address: tls://gitaly2.internal:9999 path: /some/dummy/path gitaly: token: 'abc123secret'NOTE: Note:
/some/dummy/pathshould be set to a local folder that exists, however no data will be stored in this folder. This will no longer be necessary after this issue is resolved. -
Save the file and restart GitLab.
-
On the Gitaly server nodes, edit
/home/git/gitaly/config.toml:tls_listen_addr = '0.0.0.0:9999' [tls] certificate_path = '/path/to/cert.pem' key_path = '/path/to/key.pem' -
Save the file and restart GitLab.
To observe what type of connections are actually being used in a production environment you can use the following Prometheus query:
sum(rate(gitaly_connections_total[5m])) by (type)
gitaly-ruby
Gitaly was developed to replace the Ruby application code in GitLab.
In order to save time and/or avoid the risk of rewriting existing
application logic, in some cases we chose to copy some application code
from GitLab into Gitaly almost as-is. To be able to run that code,
gitaly-ruby was created, which is a "sidecar" process for the main Gitaly Go
process. Some examples of things that are implemented in gitaly-ruby are
RPCs that deal with wikis, and RPCs that create commits on behalf of
a user, such as merge commits.
Number of gitaly-ruby workers
gitaly-ruby has much less capacity than Gitaly itself. If your Gitaly
server has to handle a lot of requests, the default setting of having
just one active gitaly-ruby sidecar might not be enough. If you see
ResourceExhausted errors from Gitaly, it's very likely that you have not
enough gitaly-ruby capacity.
You can increase the number of gitaly-ruby processes on your Gitaly
server with the following settings.
For Omnibus GitLab
-
Edit
/etc/gitlab/gitlab.rb:# Default is 2 workers. The minimum is 2; 1 worker is always reserved as # a passive stand-by. gitaly['ruby_num_workers'] = 4 -
Save the file and reconfigure GitLab.
For installations from source
-
Edit
/home/git/gitaly/config.toml:[gitaly-ruby] num_workers = 4 -
Save the file and restart GitLab.
Eliminating NFS altogether
If you are planning to use Gitaly without NFS for your storage needs and want to eliminate NFS from your environment altogether, there are a few things that you need to do:
- Make sure the
gituser home directory is on local disk. - Configure database lookup of SSH keys to eliminate the need for a shared authorized_keys file.
- Configure object storage for job artifacts including live tracing.
- Configure object storage for LFS objects.
- Configure object storage for uploads.
NOTE: Note: One current feature of GitLab that still requires a shared directory (NFS) is GitLab Pages. There is work in progress to eliminate the need for NFS to support GitLab Pages.
Limiting RPC concurrency
It can happen that CI clone traffic puts a large strain on your Gitaly service. The bulk of the work gets done in the SSHUploadPack (for Git SSH) and PostUploadPack (for Git HTTP) RPC's. To prevent such workloads from overcrowding your Gitaly server you can set concurrency limits in Gitaly's configuration file.
# in /etc/gitlab/gitlab.rb

gitaly['concurrency'] = [
  {
    'rpc' => "/gitaly.SmartHTTPService/PostUploadPack",
    'max_per_repo' => 20
  },
  {
    'rpc' => "/gitaly.SSHService/SSHUploadPack",
    'max_per_repo' => 20
  }
]
This will limit the number of in-flight RPC calls for the given RPC's. The limit is applied per repository. In the example above, each on the Gitaly server can have at most 20 simultaneous PostUploadPack calls in flight, and the same for SSHUploadPack. If another request comes in for a repository that hase used up its 20 slots, that request will get queued.
You can observe the behavior of this queue via the Gitaly logs and via
Prometheus. In the Gitaly logs, you can look for the string (or
structured log field) acquire_ms. Messages that have this field are
reporting about the concurrency limiter. In Prometheus, look for the
gitaly_rate_limiting_in_progress, gitaly_rate_limiting_queued and
gitaly_rate_limiting_seconds metrics.
The name of the Prometheus metric is not quite right because this is a concurrency limiter, not a rate limiter. If a client makes 1000 requests in a row in a very short timespan, the concurrency will not exceed 1, and this mechanism (the concurrency limiter) will do nothing.
Troubleshooting Gitaly
gitaly-debug
The gitaly-debug command provides "production debugging" tools for Gitaly and Git
performance. It is intended to help production engineers and support
engineers investigate Gitaly performance problems.
If you're using GitLab 11.6 or newer, this tool should be installed on
your GitLab / Gitaly server already at /opt/gitlab/embedded/bin/gitaly-debug.
If you're investigating an older GitLab version you can compile this
tool offline and copy the executable to your server:
git clone https://gitlab.com/gitlab-org/gitaly.git
cd cmd/gitaly-debug
GOOS=linux GOARCH=amd64 go build -o gitaly-debug
To see the help page of gitaly-debug for a list of supported sub-commands, run:
gitaly-debug -h
Commits, pushes, and clones return a 401
remote: GitLab: 401 Unauthorized
You will need to sync your gitlab-secrets.json file with your GitLab
app nodes.
Client side GRPC logs
Gitaly uses the gRPC RPC framework. The Ruby gRPC
client has its own log file which may contain useful information when
you are seeing Gitaly errors. You can control the log level of the
gRPC client with the GRPC_LOG_LEVEL environment variable. The
default level is WARN.
Observing gitaly-ruby traffic
gitaly-ruby is an internal implementation detail of Gitaly,
so, there's not that much visibility into what goes on inside
gitaly-ruby processes.
If you have Prometheus set up to scrape your Gitaly process, you can see
request rates and error codes for individual RPCs in gitaly-ruby by
querying grpc_client_handled_total. Strictly speaking, this metric does
not differentiate between gitaly-ruby and other RPCs, but in practice
(as of GitLab 11.9), all gRPC calls made by Gitaly itself are internal
calls from the main Gitaly process to one of its gitaly-ruby sidecars.
Assuming your grpc_client_handled_total counter only observes Gitaly,
the following query shows you RPCs are (most likely) internally
implemented as calls to gitaly-ruby:
sum(rate(grpc_client_handled_total[5m])) by (grpc_method) > 0
Repository changes fail with a 401 Unauthorized error
If you're running Gitaly on its own server and notice that users can
successfully clone and fetch repositories (via both SSH and HTTPS), but can't
push to them or make changes to the repository in the web UI without getting a
401 Unauthorized message, then it's possible Gitaly is failing to authenticate
with the other nodes due to having the wrong secrets file.
Confirm the following are all true:
-
When any user performs a
git pushto any repository on this Gitaly node, it fails with the following error (note the401 Unauthorized):remote: GitLab: 401 Unauthorized To <REMOTE_URL> ! [remote rejected] branch-name -> branch-name (pre-receive hook declined) error: failed to push some refs to '<REMOTE_URL>' -
When any user adds or modifies a file from the repository using the GitLab UI, it immediatley fails with a red
401 Unauthorizedbanner. -
Creating a new project and initializing it with a README successfully creates the project but doesn't create the README.
-
When tailing the logs on an app node and reproducing the error, you get
401errors when reaching the/api/v4/internal/allowedendpoint:# api_json.log { "time": "2019-07-18T00:30:14.967Z", "severity": "INFO", "duration": 0.57, "db": 0, "view": 0.57, "status": 401, "method": "POST", "path": "\/api\/v4\/internal\/allowed", "params": [ { "key": "action", "value": "git-receive-pack" }, { "key": "changes", "value": "REDACTED" }, { "key": "gl_repository", "value": "REDACTED" }, { "key": "project", "value": "\/path\/to\/project.git" }, { "key": "protocol", "value": "web" }, { "key": "env", "value": "{\"GIT_ALTERNATE_OBJECT_DIRECTORIES\":[],\"GIT_ALTERNATE_OBJECT_DIRECTORIES_RELATIVE\":[],\"GIT_OBJECT_DIRECTORY\":null,\"GIT_OBJECT_DIRECTORY_RELATIVE\":null}" }, { "key": "user_id", "value": "2" }, { "key": "secret_token", "value": "[FILTERED]" } ], "host": "gitlab.example.com", "ip": "REDACTED", "ua": "Ruby", "route": "\/api\/:version\/internal\/allowed", "queue_duration": 4.24, "gitaly_calls": 0, "gitaly_duration": 0, "correlation_id": "XPUZqTukaP3" } # nginx_access.log [IP] - - [18/Jul/2019:00:30:14 +0000] "POST /api/v4/internal/allowed HTTP/1.1" 401 30 "" "Ruby"
To fix this problem, confirm that your gitlab-secrets.json file
on the Gitaly node matches the one on all other nodes. If it doesn't match,
update the secrets file on the Gitaly node to match the others, then
reconfigure the node.
Command line tools cannot connect to Gitaly
If you are having trouble connecting to a Gitaly node with command line (CLI) tools, and certain actions result in a 14: Connect Failed error message, it means that gRPC cannot reach your Gitaly node.
Verify that you can reach Gitaly via TCP:
sudo gitlab-rake gitlab:tcp_check[GITALY_SERVER_IP,GITALY_LISTEN_PORT]
If the TCP connection fails, check your network settings and your firewall rules. If the TCP connection succeeds, your networking and firewall rules are correct.
If you use proxy servers in your command line environment, such as Bash, these can interfere with your gRPC traffic.
If you use Bash or a compatible command line environment, run the following commands to determine whether you have proxy servers configured:
echo $http_proxy
echo $https_proxy
If either of these variables have a value, your Gitaly CLI connections may be getting routed through a proxy which cannot connect to Gitaly.
To remove the proxy setting, run the following commands (depending on which variables had values):
unset http_proxy
unset https_proxy